
Furnace Troubleshooting: Staying Warm During Fall Travels
RV Furnace Repair Seattle | Mobile RV Heating Service
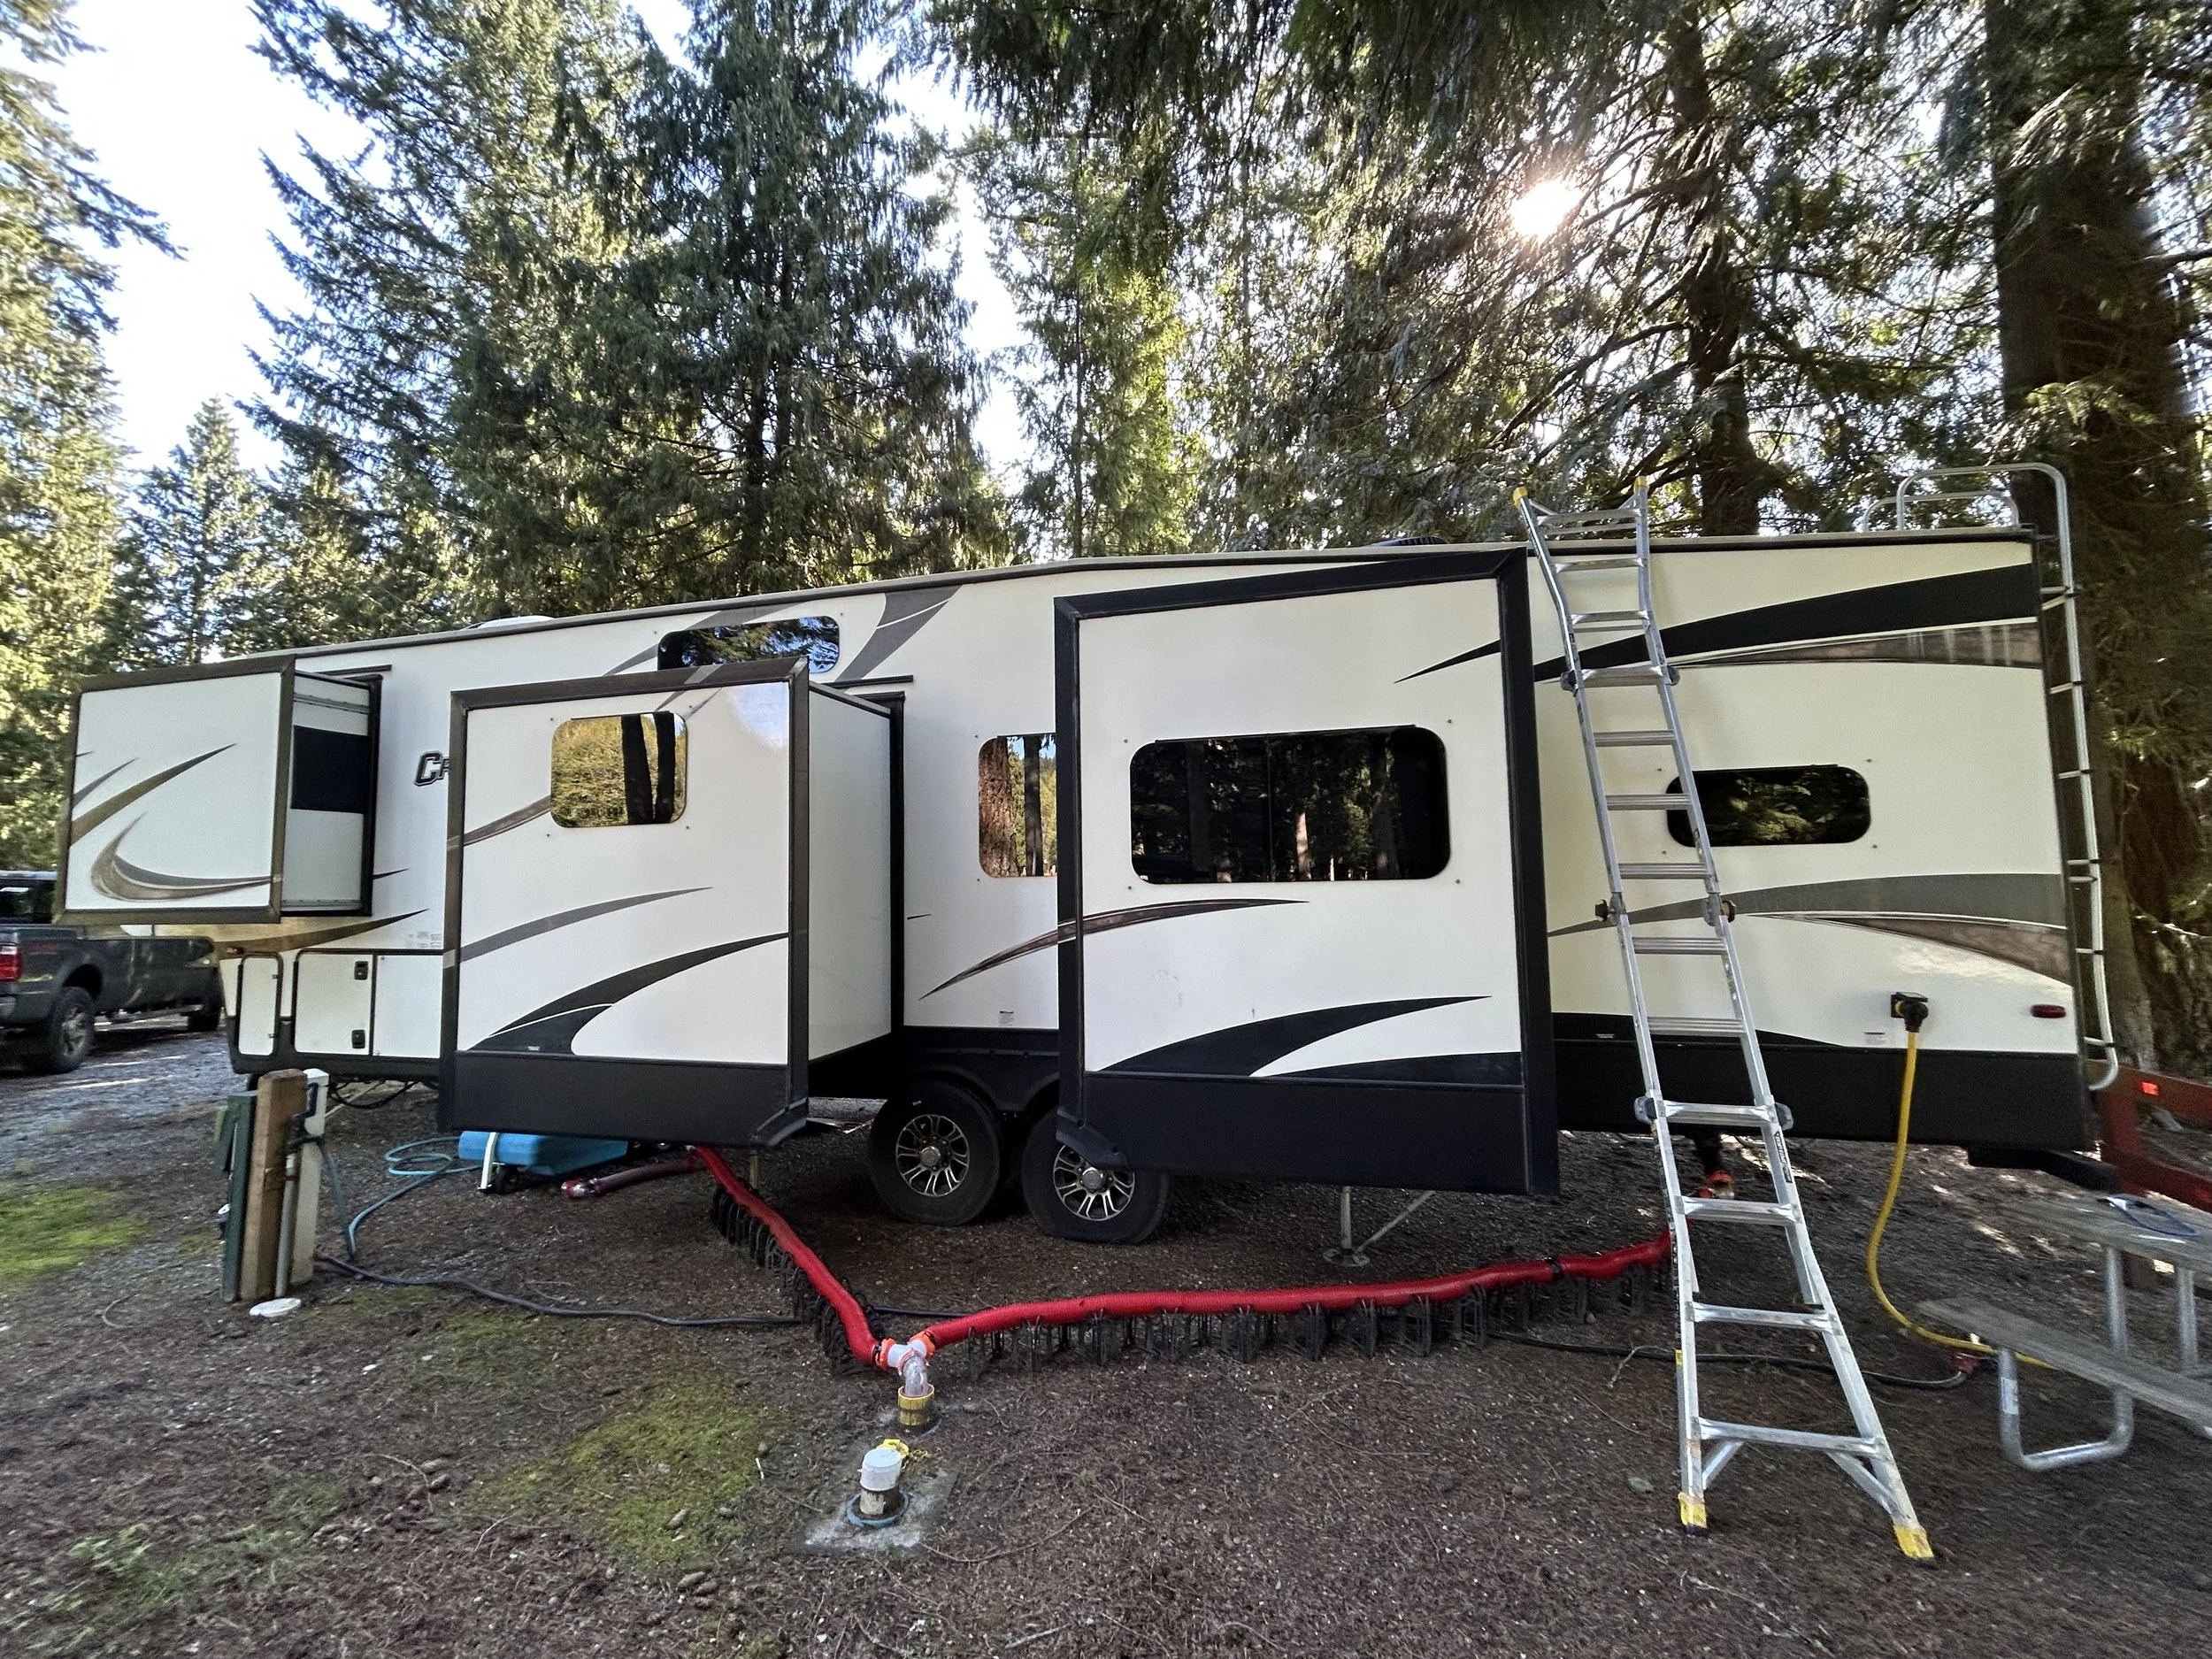
There’s nothing worse than a cold RV when you’re parked in the Cascades or camped near Puget Sound in the fall. RV furnaces are reliable—until they aren’t. When the heat stops, you need answers fast.
At Odyssey Mobile RV Repair, we help RVers stay warm with mobile RV furnace repair from Seattle to the Canadian border. Here are the most common furnace issues we see and how to troubleshoot them.
1. Furnace Won’t Turn On
The Problem: No fan, no click, no heat.
The Fix: Start with the basics—check your battery voltage. Your furnace relies on 12V power to operate, even on propane. Low voltage can prevent ignition or blower motor function.
Also check:
Thermostat settings and wiring
Blown fuse or tripped breaker
Loose or corroded ground wire
2. Clicking but No Ignition
The Problem: You hear it trying to start, but no flame.
The Fix: This usually means a propane issue or dirty ignitor. Confirm your propane tank has gas and that the valve is open. You may need to reset the propane detector or solenoid valve.
Still not working? A bad sail switch, circuit board, or ignitor could be the issue. We can usually source OEM parts locally or online fast.
3. Furnace Blows Cold Air
The Problem: The blower runs, but there's no heat.
The Fix: The control board may be locking out the burner due to a failed ignition attempt or airflow issue. Clogged air return vents or a bad limit switch can also trigger this.
Running on a nearly empty propane tank can cause intermittent heat or flame dropouts.
4. Short Cycling or Overheating
The Problem: The furnace turns on, heats briefly, then shuts off.
The Fix: This is often caused by restricted airflow or dirty burner chambers. Check return air filters, ducts, and the blower motor for dust or pet hair buildup.
If the furnace is overheating, a faulty high-limit switch may also be to blame.
5. Bad Smell or Soot
The Problem: Burning smell, soot buildup, or CO detector alarm.
The Fix: These are serious issues. Shut the furnace off immediately. Soot indicates incomplete combustion, which could mean a cracked heat exchanger or blocked exhaust vent.
If you notice unusual smells or see black residue around the furnace vent, don’t wait—schedule a mobile inspection.
Keep the Chill Out
Washington fall weather can be unpredictable. Don’t wait for your furnace to fail when you need heat the most. Odyssey Mobile RV Repair delivers fast, on-site furnace diagnostics and repairs—wherever your rig is parked.
Trailer Bearing Repack: Ensuring Safe Travels
RV Bearing Repack Washington | Mobile Trailer Maintenance
Its Fall, just about the time when all the snowbirds start heading south again. Towing a travel trailer with dry or damaged wheel bearings is like playing mechanical roulette. Bearing failure on the road is not only dangerous—it’s expensive. A quick and affordable repack can save your trip (and your axles).
At Odyssey Mobile RV Repair, we offer mobile trailer bearing repack services across Washington’s I-5 corridor. Here’s what you need to know to keep your wheels turning safely.
1. What Is a Bearing Repack?
It’s the process of removing your trailer’s wheel hubs, cleaning out the old grease, inspecting the bearings and races, then packing fresh grease and closing it all back up with fresh bearing seals.
Why It Matters:
Old grease breaks down over time and can’t protect your bearings from heat and friction. A dry bearing can seize, shear off a wheel, or even start a fire.
2. How Often Should It Be Done?
Industry standard recommends repacking every 12 months or 10,000 miles, whichever comes first.
But if you’ve:
Driven through heavy rain or deep puddles
Left your trailer sitting in storage for over a year
Noticed unusual noise or wobble in the wheels
…you might be overdue.
3. Signs Your Bearings Need Attention
Grease streaks on the inside of wheels
Excess heat after towing
Visible rust near the hubs
Grinding or squealing when braking
If you’ve experienced any of these, it’s time to schedule a repack before you hit the road again.
4. Why Mobile Repack Makes Sense
Towing your trailer to a shop just for basic maintenance isn’t ideal. We come to your driveway, storage lot, or campsite and handle the whole job on-site. No hitching up, no hassle, no 2 week wait.
Our service includes:
Full bearing inspection
Lucas Oil, Marine Grease (water resistant)
Replacement bearing seals
5. What If the Bearings Are Bad?
If we find pitting, scoring, or excessive wear, we can replace the bearings and races on-site. There is an extra cost of course for the bearings themselves if they are bad, and thankfully, auto parts suppliers stock them so there is no waiting. Catching a failing bearing early can save your axle from thousands in costly damage and keep you safe on the highway.
Roll Smooth Into Your Next Adventure
Don’t take risks with your trailer’s safety. A simple bearing repack can prevent major repairs and give you peace of mind for the road ahead. Schedule your mobile trailer maintenance before your next trip.
Winterizing Your RV: Step-by-Step Guide
RV Winterization Burlington WA | Mobile RV Winter Prep
Freezing temperatures are no joke for RVers. A single cold snap can burst pipes, crack fittings, and destroy your water heater. We replace a dozen instant hot water heaters every winter it seems. Whether you're storing your RV for the season or prepping for cold-weather travel, winterization is essential.
At Odyssey Mobile RV Repair, we help RV owners along the I-5 Corridor from Seattle to Canada to protect their investment with proper mobile RV winter prep services. Here's a step-by-step guide to winterizing your RV the right way.
1. Drain All Water Lines
Start by emptying the fresh water tank, gray tank, and black tank. Don’t forget the water heater—open the drain plug and pressure relief valve to release all water.
Do not forget: Remove the anode rod (Suburban) or plastic plug (Dometic/Atwood) for a full drain, and let it air out completely. Stock up on another anode rod or drain plug for the spring season and leave it inside the service door of your water heater.
2. Bypass the Water Heater
If you plan to use RV antifreeze, bypassing the water heater saves you gallons of fluid and a big mess.
Most RVs have a bypass valve or kit installed—look for a three-valve setup near the back of the water heater. If not, we can install one during your winterization service with high quality brass valves that will last you years to come.
3. Should you blow out your lines? (Optional)
Some RVers use a blow-out plug and an air compressor to push out any remaining water in the plumbing system. We don’t blow out lines ourselves, but many people do with success every year. Just be sure to set the pressure to 30–40 PSI to avoid damaging lines.
Open faucets one at a time while blowing air through the system, including the toilet and outside shower.
4. Add RV Antifreeze
Use only non-toxic RV antifreeze. Never automotive antifreeze. (don’t ask why we have to mention this).. Pump RV antifreeze through the system until pink fluid comes out of every faucet, toilet, and showerhead. Start at the water pump, sucking the antifreeze directly from the container into the water lines, then fixtures, closest to furthest, cold and hot water sides separate.
Don’t forget:
City water inlet
Ice maker (if equipped)
Washing machine hookups
Outdoor kitchen faucet
Outdoor Showers
If you're unsure which ports to treat, let us handle it on-site.
5. Seal and Secure Exterior
Inspect all exterior seals and roof penetrations. Cold temps can shrink and crack sealant, leading to leaks during winter rains.
Also:
Close propane tanks
Cover or block vent openings
Remove or store batteries with a float charger
We Make It Easy
Skip the hassle of hoses, compressors, and pink-stained driveways. Odyssey Mobile RV Repair offers on-site winterization service to protect your RV before the freeze sets in. Fast, clean, and thorough, just like it should be. We can also come to your storage facility if you keep your rig there over winter. The best way to schedule your winterization or de-winterization is with our link below.
Slide-Out Maintenance: Keeping Your RV Slides Smooth
RV Slide-Out Repair Washington | Mobile RV Slide Maintenance
Slide-outs add serious comfort to your RV—but when they start sticking, squeaking, or leaking, they can turn into a major headache if they fail. Slide system failure is one of the most common (and expensive) repairs RVers face, especially if maintenance has been skipped or overlooked.
At Odyssey Mobile RV Repair, we handle mobile slide-out repairs and maintenance throughout Washington’s I-5 corridor. If you need emergency Slide-Out retraction, give us a call. We will take on any rescue mission you might be facing.
Anyway, here’s a few things you can do to keep your slide mechanisms running smooth and your seals in top shape.
1. Lubricate the Slide Mechanism
Metal-on-metal friction wears down components fast. Lack of lubrication is the leading cause of early slide system wear.
What to Do:
Use a dry lube designed for slide-outs, never WD-40
Apply to rails, gears, or rams (depending on your slide style) Keep in mind, different slide outs are maintained differently
Wipe off excess to prevent dirt buildup
Annual lubrication is enough for most RVers. More if you're full-timing or traveling often. Dirt and debris acts like sandpaper between the metal components moving the wieght from the slide box.
2. Inspect Slide Seals
Slide seals do two jobs: keeping water out and keeping air in. If they’re torn, misaligned, or dry, they won’t do either.
What to Look For:
Cracks or rips
Gaps when closed
Water stains or mildew near slide edges
Brittleness from UV exposure
Use a slide seal conditioner every few months to preserve flexibility.
3. Watch for Motor or Gearbox Strain
If your slide hesitates, groans, or moves unevenly, stop immediately. Forcing it can cause the motor to burn out or strip a gear.
Possible causes:
Low battery voltage
Obstructions inside the mechanism
Misalignment from frame shifting or axle settling
We carry replacement gearboxes, shear pins, and motors for on-site repair.
4. Check Alignment and Topper Condition
If your slide rubs, pinches, or catches while moving, it may be misaligned. That puts strain on the whole system.
Also inspect your slide topper (if equipped):
Look for tears, pooling water, or excessive sag
Check the roller spring tension
We can adjust, replace, or install slide toppers on the spot if needed.
5. Don’t Run Slides on Low Battery
Slide mechanisms need strong, stable 12V power to operate smoothly. Running them on a drained battery can cause hesitation and controller faults.
Best Practice: Always plug in to shore power or ensure a full battery charge before operating your slides.
Smooth Travels Start with Smooth Slides
We know RV slide-outs inside and out. From rubber seal conditioning to full system replacements, we’re equipped to handle it all—right at your site.
Whether you’re on Whidbey, camping in Concrete, or anywhere along the I-5 Corridor, trust Odyssey to keep your RV systems running like they should. Schedule online by clicking below.

Avoiding Roof Leaks: Tips for RV Roof Inspection and Repair
RV Roof Repair Burlington WA | Mobile RV Roof Sealing
A leaking RV roof doesn’t just ruin your weekend—it can destroy your rig. Water intrusion is the silent killer of travel trailers, fifth wheels, and motorhomes alike. One small crack or tear in your roof sealant can quietly soak insulation, rot wood framing, and lead to costly mold damage before you even notice.
At Odyssey Mobile RV Repair, we specialize in mobile RV roof sealing and repair from Burlington to the Canadian border. Here’s how to stay ahead of leaks and make sure your roof is road-ready all year long.
Before getting into the meat of this article: We would never recommend you rely on a mobile repair if it involves serious damage, or there if there is underlying water damage. We will never band aid something and send you on your way. For a guaranteed large scale roof repair/replacement, we would only recommend a shop outfitted for this large of a repair for several obvious reasons Although a shop is in the works here at Odyssey, we have trusted service centers we can refer you to.
1. Perform a Seasonal Roof Inspection
What to Look For:
Cracks or gaps in lap sealant
Loose or lifting edges around skylights, vents, and antenna bases
Torn or punctured roof membrane (TPO, EPDM, or fiberglass)
We recommend a visual roof check every 90 days, especially after storms, tree branch impacts, or high winds. Many campgrounds are situated under the beautiful evergeens we are so lucky to have in Washington. It only takes one branch to poke the rubber clean through.
2. Clean the Roof Before You Seal
Dirt and debris trap moisture and reduce the effectiveness of sealants. Always wash your roof before applying new products. Use a soft-bristle brush and RV-safe roof cleaner—not household soap or degreasers.
This also helps you spot hidden damage you might otherwise miss. Mold forms on roofs of homes and RV’s frequently. Cleaning it off is paramount to seeing the true condition of your roof.
3. Use the Right Sealant
Different roof types require different sealants. Using the wrong one can do more harm than good.
EPDM rubber roofs: Use self-leveling Dicor or equivalent.
TPO roofs: Check compatibility before sealing—some sealants won’t adhere properly.
Fiberglass roofs: Often need a different approach, including gelcoat repair or specialty caulk like SikaFlex.
Not sure which you have? Call us—we’ll inspect it for you.
4. Inspect Roof Fixtures
Your roof-mounted components—AC units, solar panels, antenna mounts—are common leak points.
Check for:
Cracked mounting brackets
Missing screws
Warped plastic covers
Old AC 14x14 Gaskets (these are common fail points)
It’s easy to overlook these, but they’re often the source of slow leaks.
5. Consider a Full Reseal or Roof Recoat
If your roof is 5+ years old or you’re seeing multiple problem areas, it might be time for a professional reseal.
At Odyssey, we offer on-site roof resealing services—no dealership visit required. The catch is, the weather has to be in order for the cleaning, resealing and cure time. Even then, there is no controlling the elements. These are considerations we have to keep in mind, that being said we can and do reseal roofs in the summertime.
Don’t Let a Drip Become a Disaster
Roof issues compound fast. That’s why regular inspections and sealing are some of the most important RV maintenance tasks you can do. Whether you’re prepping for the season or just spotted a stain inside your rig, we’ve got your back.
Water Heater Maintenance: Ensuring Hot Water on the Road
RV Water Heater Repair Seattle | Mobile RV Plumbing Services
Nothing beats a hot shower after a long day of hiking, driving, or exploring.. but only if your RV water heater is up for the task. If your water heater isn’t working like it used to, or you want to make sure it lasts all season, it might be time for a maintenance check.
At Odyssey Mobile RV Repair, we keep the hot water flowing for RVers all over Washington—from Seattle to the Canadian border. Here’s how to maintain your water heater and spot early signs of trouble.
1. Flush the Tank Regularly
Why It Matters: Sediment builds up inside your tank over time, especially with hard water. This reduces efficiency, shortens the life of your anode rod, and causes weird noises.
What to Do: Drain the tank fully, flush with clean water, and consider using a water heater flush wand for better results. We recommend flushing at least once per year—more often if you use your RV frequently.
2. Check and Replace the Anode Rod
Why It Matters: If you have a Suburban-style water heater, the anode rod protects your tank from corrosion. Once it’s used up, the tank starts to rust from the inside out.
What to Do: Inspect the rod at least once a season. If more than 75% of the rod is gone, it’s time to replace it. Keep a spare on hand—it’s a cheap insurance policy. When we winterize your unit, we check these items and flush your water heater at our appointment.
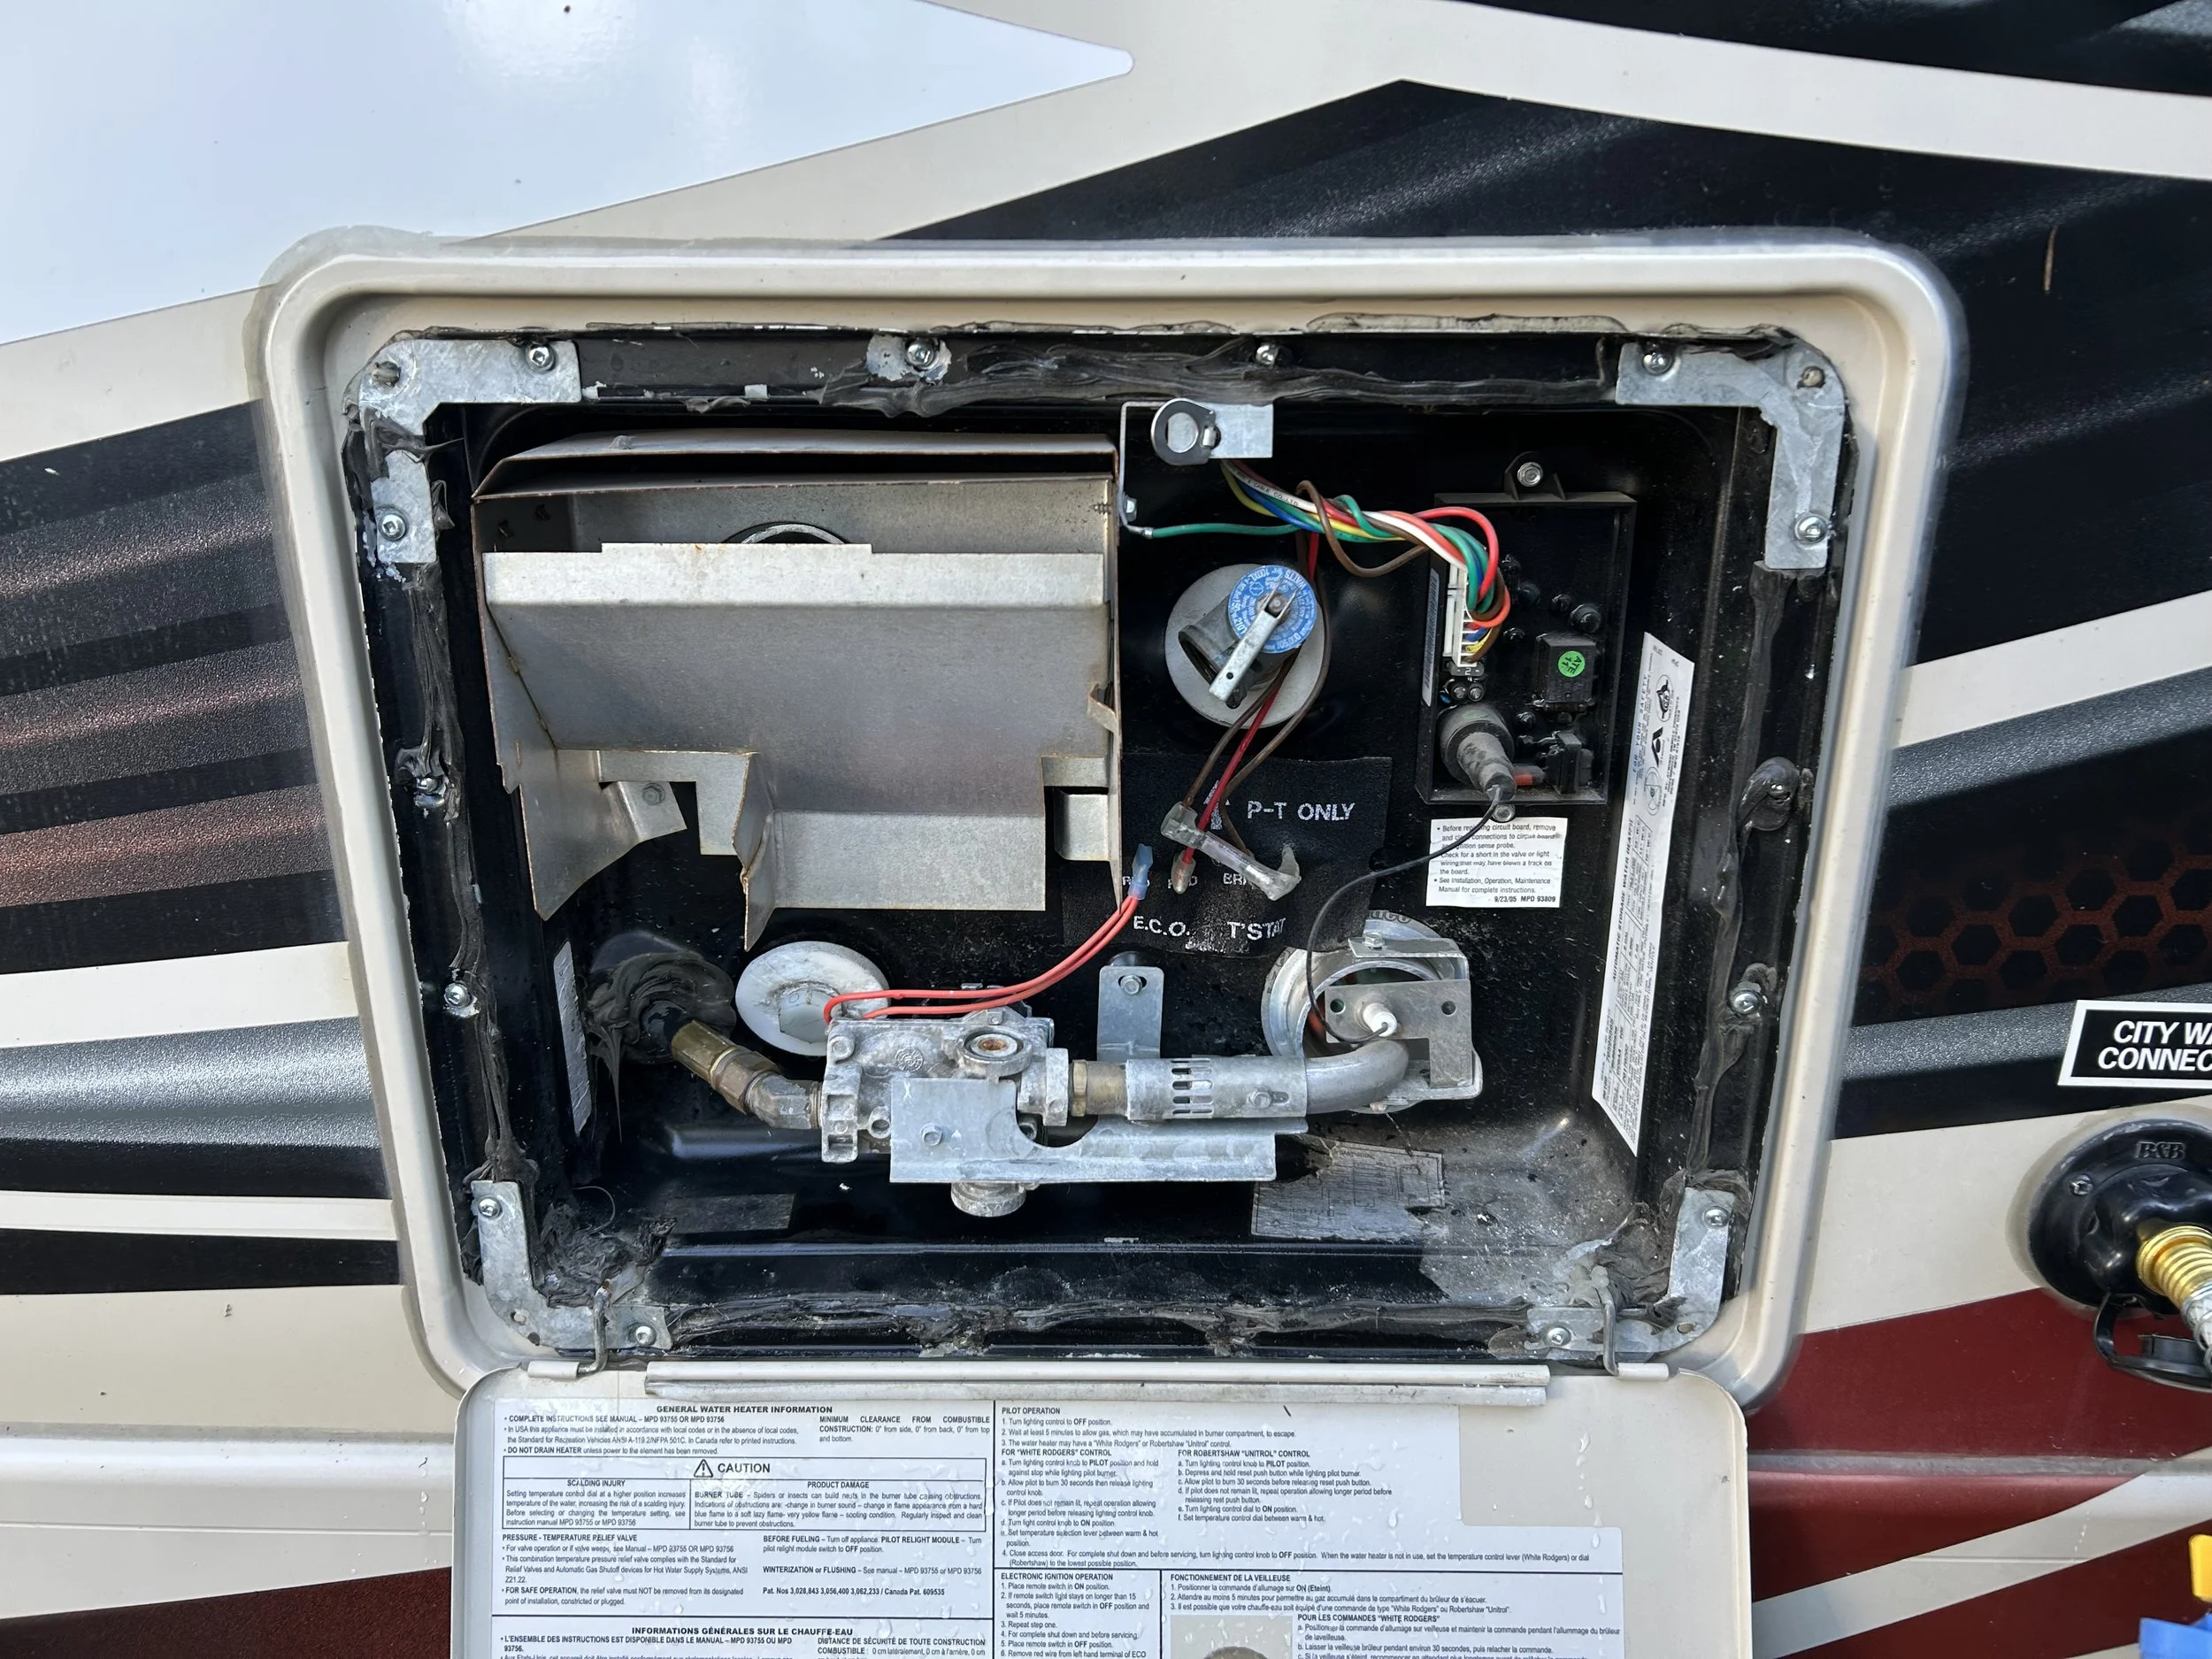
3. Inspect Burner-Ignitor assembly
Why It Matters: For propane water heaters, carbon buildup or rust can block the flame or prevent ignition.
What to Do: Clean the burner tube, inspect the flame (should be blue, not yellow), and verify the ignitor clicks. If you hear clicking with no flame, you may need a new ignitor or circuit board.
4. Test the Electric Element
Why It Matters: Combination water heaters use both propane and electric power. If one works and the other doesn’t, you may have a failed element or a blown fuse. The electric element is not really useful if you are boondocking, so be careful not to confuse the two. Using your water heater on propane is your true ‘water heating’ method when on the road. Electric needs shore power to work and will take a few hours to get warm enough water for a hot shower. If you aren’t sure, give us a call!
What to Do: Use a multimeter to test the element’s resistance. No reading means it’s time to replace. Also, check for tripped breakers and GFCIs.
5. Seal and Protect the Exterior Access Panel
Why It Matters: The water heater’s exterior access panel is exposed to the elements year-round. Water intrusion and bugs can wreak havoc.
What to Do: Reseal the edges if cracked. Check the burner chamber tube for wasps and debris. If your door is loose, it may need to be realigned or replaced.
Stay Warm and Comfortable
Whether your RV water heater runs on propane, electric, or both, keeping it in shape is essential for life on the road. Odyssey Mobile RV Repair offers on-site water heater repair and maintenance from Seattle to Bellingham.
Common Air Conditioner Problems in RVs and Solutions.
RV AC Repair Burlington WA | Mobile RV Air Conditioning Service
When the heat hits Washington and your RV’s air conditioner decides to quit, it’s not just uncomfortable—it can ruin the whole trip. Whether you’re boondocking near Bellingham or parked under the summer sun in Mount Vernon, a faulty AC is a major buzzkill.
At Odyssey Mobile RV Repair, we service RV air conditioners all along the I-5 corridor. Here are the most common issues we see with rooftop AC units—and what you can do to keep your cool on the road.
1. Blowing Air, But Not Cold
The Problem: Your AC fan is working, but the air coming out isn’t cool.
The Fix: This usually points to low refrigerant, a bad capacitor, or a failing compressor. Unlike residential units, most RV ACs are sealed systems, so if refrigerant is the issue, it likely means a full replacement is needed. Capacitors, however, are serviceable on-site.
2. Unit Won’t Turn On
The Problem: No sound, no fan, no response at all.
The Fix: First, check your circuit breakers and fuses—especially if you’re running other high-load appliances. Next, test your thermostat. If it’s digital, make sure it has power or replace the batteries. If all checks out, the issue may be a faulty control board or a bad capacitor.
3. Air Conditioner Freezes Up
The Problem: Ice forming on the coils or cool air suddenly stops.
The Fix: Dirty filters, low airflow, or high humidity are the top suspects. Turn off the unit, let it thaw, and clean or replace your air filter. Run the fan only for 30 minutes before restarting the cooling cycle. If it keeps freezing, the evaporator coil or blower motor could be to blame.
4. Strange Noises or Vibrations
The Problem: Loud humming, buzzing, or rattling up top.
The Fix: Loose fan blades, worn bearings, or even debris in the unit can cause this. It’s worth opening the shroud and inspecting for anything obvious. If the noise persists, have a mobile RV technician inspect the motor and mounting brackets to prevent damage from vibration.
5. Bad Smells When Running
The Problem: Musty or burning smells when the AC is running.
The Fix: A musty odor often points to mold inside the evaporator or ducting—common if the AC hasn’t been used in months. A burning smell could indicate electrical failure. Turn the unit off immediately and call a professional.
We’ll Keep You Cool
There’s no reason to sweat it out while waiting on a service center. From Burlington to Bellingham, Odyssey Mobile RV Repair comes to you. We diagnose, repair, and replace RV air conditioning units without the hassle of towing your rig.

Preparing Your RV for Summer: Essential Maintenance Tips
RV Summer Maintenance Washington | Mobile RV Service along Washington’s I-5 Corridor
Summer’s calling—are you ready to roll? Before you hit the open road to chase 70 or park beachside for the season, your RV needs eyes on it. Skipping summer prep can turn your relaxing getaway into a roadside repair situation which is not cheap.
Here’s a breakdown of the must-do RV summer maintenance tasks we recommend for Washington RVers. Whether you’re a weekend warrior or a full-timer cruising by the PNW, these tips will help keep you moving without issue.
1. Inspect and Reseal the Roof
Water leaks don’t take summer off. UV rays can crack and dry out sealants fast, especially on TPO or EPDM roofs.
Clean the roof (carefully)
Inspect all sealants around vents, skylights, AC units
Reseal with RV-specific lap sealant if needed
Put 303 Aerospace Protectant on plastic components.. Your skylights, AC covers and vent lids if you want UV protection on these roof fixtures.
One heavy rain can cost thousands if you don’t catch it. Stay ahead of it. If you suspect water damage, we are happy to take a look for you if you’re in the area.
2. Check A/C and Ventilation
Don’t wait for a 95-degree day to realize your AC isn’t blowing cold.
Clean or replace air filters (thicker filters will cause the AC to run harder)
Test the unit and thermostat function before you leave on a trip. Use a thermometer in the cold air vent, you should see a 15-20 degree difference on average from the ambient temperature outside.
Consider an AC soft start for smoother operation long term
If your rooftop AC is dead or weak, we can swap it roadside or at your site.
3. Flush and Sanitize the Fresh Water System
That funky taste? Probably from water left in the lines over winter… Just a PSA, we don’t recommend drinking your RV’s water (if at all possible.)
Sanitize with diluted bleach or RV-specific sanitizer
Run the solution through the system and rinse thoroughly
Replace any leaky hoses or cracked fittings, including silicon compression cone washers.
Want a crisp clean taste all summer? Install an inline water filter before your city water inlet. This makes a huge difference. Water filtration systems are also possible if you would like.
4. Inspect Tires and Brake Components
Summer heat expands air pressure and exposes weak spots in old rubber. Check all your tires, RV, trailer, tow vehicle etc.
Check tire pressure and tread
Look for sidewall cracking or dry rot.
Cracks in between tread the tread pattern.
If you have grease-able bearings and can’t recall when they were last repacked, it would be a good idea to schedule a bearing repack with us.
Blowouts on I-5 are no joke. You risk thousands in damage if your tire damages your fiberglass during a blow-out, not to mention the cost of time and money if your trip is delayed.. then there is the repair cost. Schedule a tire check and bearing repack before your trip.
5. Test Propane and Appliances
Safety first—always test your propane lines for leaks using soapy water.
Verify propane level
Check for leaks at connections
Test each appliance (fridge, stove, furnace—even if it’s summer!)
Keep a working carbon monoxide and propane detector onboard at all times.
We Come to You
Let us handle the dirty work so you can focus on the adventure. Whether you're parked in Bellingham, Everett, or Skagit County, we come to you for mobile RV maintenance and repairs—no waiting rooms, no dealerships, just professional service at your site. We are 5 star rated on google and warranty our repairs.

How do I know if my RV’s Converter is Failing?
Is your RV converter failing? Learn to identify the signs of a faulty converter and test voltage output. Odyssey Mobile RV Repair provides expert RV electrical services along the I-5 Corridor from Bellingham to Seattle. Based in Burlington, WA.
The RV converter is a critical component of your electrical system, converting shore power into 12V DC to charge your battery and run essentials. When it fails, your lights may dim, appliances might stop working, and your battery could drain quickly. If you’re in Mt. Vernon for the season or traveling the I-5 Corridor down passed Seattle, here’s how to identify a faulty converter and what to do about it.
1. Symptoms of a Faulty Converter
Converters can fail gradually or all at once.
Common Signs:
Dim or flickering lights.
Batteries that won’t charge.
Your Battery Voltage Display shows a dead battery even though you are plugged into shore power.
Appliances not working despite shore power.
Pro Tip: Use a multimeter to check if the converter is outputting the correct voltage. Typically 13.4 VDC for Lead Acid Batteries and 14.6 for Lithium.
2. Check for Physical Damage
Converters are prone to overheating or physical wear.
What to Look For: Burnt smells, melted wiring, or unusual noises.
Quick Fix: Ensure the converter has proper ventilation to prevent overheating.
3. Test the Voltage Output
A converter’s job is to step down 120V AC power into 12V DC.
How to Test: Use a multimeter to measure the voltage at the converter terminals. It should read between 13.2 and 14.4 volts when charging.
When to Replace: If the output is outside the acceptable range, the converter may need replacement.
Affiliate Disclosure
This article contains affiliate links. If you purchase something through these links, we may earn a small commission at no additional cost to you. Thanks for supporting us!
Call to Action
Don’t let a faulty converter ruin your trip. From Marysville to Tacoma, Odyssey Mobile RV Repair has you covered.
👉 Submit your service request now to get your RV converter diagnosed and repaired by professionals.

Top 5 Electrical Issues in RVs and How to Troubleshoot Them.
If you’ve ever flipped a switch in your RV and nothing happened, you know the feeling—frustrating, inconvenient, and sometimes a little scary. Whether you’re camping deep in the Cascades or enjoying the tranquil bay coast line of La Connor, electrical issues can put a real damper on your adventure.
At Odyssey Mobile RV Repair, we handle these problems every day, right where you are—no towing required. Let’s break down the top five RV electrical issues we see along Washington’s I-5 corridor and what you can do about them before giving us a call. Of course, if you want to get straight to scheduling, you can do so here on our Scheduling Page.
1. Dead House Batteries
The Problem: Your lights flicker, the water pump won’t run, or nothing powers on.
The Fix: Start by checking battery voltage with a multimeter. A healthy 12V battery should read around 12.6V when full. If it’s below 12.0V, recharge or replace the battery. Don’t forget to inspect the terminals—corrosion buildup is a common culprit.
Pro Tip: Add a battery disconnect switch to reduce parasitic drain when storing your RV. Some RV’s come with them from factory.
2. Faulty Shore Power Connection
The Problem: You’re plugged into a pedestal, but appliances aren’t working.
The Fix: Use a circuit tester or multi meter on the pedestal to verify power. Check your surge protector or EMS unit for error codes. Sometimes your surge protector is not working, try removing it and plugging the RV in directly. If power is reaching the coach but still no juice inside, inspect your transfer switch (if equipped) or breaker panel for tripped breakers or burned wiring.
3. Blown Fuses or Tripped Breakers
The Problem: One appliance works, but another won’t.
The Fix: Isolate the circuit. Open your fuse panel (usually behind a vented door) and visually inspect for blown fuses. For breakers, toggle them fully off and back on. Replacing with the correct amperage fuse is key—never oversize. Keep the 20A fuse, a 20A fuse. If you oversize, you could be putting your RV at risk of an electrical fire.
4. Converter Malfunction
The Problem: Your batteries are draining fast, even while plugged in.
The Fix: Your converter may have failed and is no longer charging the batteries or powering 12V systems. Use a multimeter to confirm it’s outputting 13.6V+ while plugged into shore power. If not, it’s time for a replacement—and yes, we can sometimes find them in stock same day or on Amazon for a quick repair.
5. Inverter or Solar System Conflicts
The Problem: Strange behavior when switching from shore power to solar or inverter mode.
The Fix: These setups often have transfer switches or settings that need adjusting. Check your digital control panel settings if you have one installed. If you installed a new lithium battery recently, confirm your converter or solar controller is lithium-compatible.
If it’s beyond DIY-friendly, call in a pro. These systems are powerful—and complicated.
Call in the Cavalry
Mobile RV repair isn’t just convenient—it’s absolutely necessary when your coach won’t move. If you’re experiencing electrical issues anywhere from Seattle to the Canadian border, Odyssey Mobile RV Repair is here to help. We troubleshoot and fix these problems on-site, saving you the hassle and cost of towing. We are 5 star reviewed on Google and warranty our work.

How to Diagnose a Faulty RV Converter
Odyssey Mobile RV Repair brings you tips to diagnosing your RV's converter.
Your RV converter is a critical component that bridges the gap between your 120V shore power and 12V battery system. When it fails, your battery won’t charge properly or at all, leaving your 12V-powered devices will stop working. Here’s how to recognize and address a faulty converter.
Signs of a Faulty Converter
Dim or Flickering Lights: Indicates low voltage reaching your 12V devices.
Battery Won’t Charge: A clear sign your converter isn’t transforming 120V power into 12V effectively.
12V appliances Not Working: If devices like your water pump or fans stop functioning, your converter may be the issue.
One thing we find often: All other 120V power outlets, appliances and devices working fine, but you have the above symptoms where your 12V will not work. Your converter works by transforming down the 120V to 12V. That transformer inside your converter can burn out leaving only the pass through function of your 120V systems working. We wrote an article about the 120V & 12V systems here.
DIY Steps to Diagnose the Problem
Check the Battery Voltage: Use a multimeter to measure your battery voltage. A fully charged battery should read around 12.6V. A charging battery, around 13.4 or more if its a lithium battery. If it’s low and not charging when plugged into shore power, the converter could be toast.
Inspect the Converter: Locate your converter (usually near your breaker panel) and check for signs of damage, such as burnt wires or a blown internal fuse. Make sure you put out the fire if you haven’t already.
Test Shore Power at Your Pedestal or Campground Hook-up: Ensure the issue isn’t with your shore power connection. If you are unsure about how to test your shore power connection, give us a call.
Measure Output Voltage at the Converter Unit itself: Set your multimeter to DC mode and check the output terminals of the converter. If the output is below 13.6V, it’s time to replace or repair the converter. Expect to pay a larger ammount for a new converter if you have a unit that is an Inverter-Converter. This type will usually be found in Class A motorhomes or higher end towable rigs.
When to Replace Your Converter
Converters typically last 5-10 years, depending on usage and maintenance. If it’s working, leave it alone. If it stops working, replace it. There is no set time when these units go bad, and there is no telling how long yours will even last.
If you’re near Burlington or anywhere along the I-5 corridor, we can replace your converter with the same unit or better. We ask you fill out the form and gather all the information for your rig when you submit an appointment. We can pinpoint the exact converter (Sometimes availible right away on Amazon) and get you back on the road.
Recommended Upgrade
Consider upgrading to a smart converter, which adjusts the charging voltage based on your battery’s state, prolonging its lifespan.
Need Help? Call Odyssey Mobile RV Repair
Diagnosing and replacing a converter can be tricky. If you’re not confident in your skills or need help fast, Odyssey Mobile RV Repair is just a call away. We’ll come to you, whether you’re in Skagit County or further south along Puget Sound. These units can be more then $1300 at times for a replacement. Something to keep in mind if you misdiagnose the issue. No pressure. (Im talking to you DIYers out there).
Submit your service request now to get started today.

Understanding Your RV's 12V and 120V Systems.
Learn how your RV’s 12V DC and 120V AC systems work together to power essential and comfort appliances. Odyssey Mobile RV Repair provides expert services along the I-5 Corridor.
Your RV’s electrical system is the backbone of your travel comfort, powering everything from lights to air conditioners. If you’ve ever wondered how the 12V DC and 120V AC systems work together, this guide will break it down. Whether you’re exploring Tacoma or camping in one of the many resorts on Washington’s Puget Sound, understanding these systems can help you troubleshoot and maintain your RV with confidence.
1. The 12V System: Power for Essentials
The 12V DC system runs off your battery and powers essential components.
Examples of 12V Usage: Lights, water pump, fans, and control panels.
How It Charges: Batteries are recharged by the alternator, converter, or solar panels.
Maintenance Tip: Ensure all battery terminals are clean and connections are tight to avoid power loss.
2. The 120V System: Power for Comfort
The 120V AC system operates when your RV is plugged into shore power, powered by a generator or you have an Inverter stepping up your battery power (12V) to 120V.
Examples of 120V Appliances: Air conditioners, microwaves, and TVs.
Safety Tip: Use a 30 amp or 50 amp surge protector to prevent voltage spikes from damaging your appliances.
3. How the Systems Work Together (Converters & Inverters)
The converter bridges the gap between 120V and 12V systems. An Inverter, does the opposite. It takes your 12V and ups the voltage to 120V to power your outlets and appliances. Some RVs have a 2 in 1 Inverter-Converter Power Management System. These are commonly found on Class A motorhomes and higher priced RVs.
What It Does: A converter.. get ready for this.. Converts 120V AC from shore power into 12V DC to charge your battery. Your battery then runs your 12V systems.
When It Fails: Symptoms include dim lights, non-functioning appliances, or a drained battery. It can fail sooner if you do not maintain your battery. It is designed to charge your battery, not run your 12V RV system, that would be the battery’s job.
Affiliate Disclosure
This article contains affiliate links. If you make a purchase through these links, we may earn a small commission at no additional cost to you. Thanks for supporting Odyssey Mobile RV Repair!
Stay powered up on the road. Based in the heart of Skagit County, Washington, Odyssey Mobile RV Repair has the expertise to keep your RV running smoothly.
👉 Submit your service request now and let us ensure your RV’s electrical systems are working in harmony.

Tips to Prevent Overloading Your RV Electrical System.
Learn practical tips to prevent overloading your RV’s electrical system, including prioritizing appliance use and upgrading your battery bank. Odyssey Mobile RV Repair offers expert RV Mobile Repair service in Burlington-Mt. Vernon, WA and across the I-5 Corridor.
An overloaded RV electrical system can lead to tripped breakers, damaged appliances, and potential safety hazards. Whether you’re in Anacortes or Seattle, knowing how to manage your RV’s power demand is essential. Here are some practical tips to keep your system running smoothly.
1. Know Your Power Limits
Every RV has a maximum electrical load it can handle.
How to Check: Review your RV’s electrical specifications in the owner’s manual.
Pro Tip: Use an energy monitor to track real-time power usage.
2. Prioritize Appliance Usage
High-demand appliances like air conditioners and microwaves can quickly overload your system when plugged into a 20 amp circuit.
Example: Avoid running multiple appliances simultaneously when relying on battery power for your inverter.
Upgrade Opportunity: A portable inverter generator or can help manage higher loads efficiently if you aren’t able to use a 30 amp or 50 amp hookup.
3. Use Surge Protectors
Protecting your RV from power surges can prevent long-term damage.
Why It Matters: Voltage spikes can overload your system and damage appliances.
Recommended Tool: Invest in a reliable RV surge protector for peace of mind. Choose 30 amp or 50 amp for your surge protector.
4. Upgrade Your Battery Bank
A larger battery bank can handle greater power demands.
When to Upgrade: If you’re consistently running out of power, consider adding more batteries or switching to lithium-ion options.
Affiliate Disclosure
This article contains affiliate links. If you purchase through these links, we may earn a small commission at no additional cost to you. Thanks for supporting us!
Call to Action
Avoid power problems on your next adventure. Odyssey Mobile RV Repair provides expert electrical services from Everett to Tacoma.
👉 Submit your service request now to get your RV running at peak performance.
SEO Title
Tips to Prevent Overloading Your RV Electrical System
SEO Description
Learn practical tips to prevent overloading your RV’s electrical system, including prioritizing appliance use and upgrading your battery bank. Odyssey Mobile RV Repair offers expert service across the I-5 Corridor.

Common Causes of RV Battery Drain and How to Fix Them.
Learn about common causes of RV battery drain, including parasitic power draws and faulty charging systems. Find expert solutions and product recommendations. Odyssey Mobile RV Repair serves RV Owners in Burlington, WA and the throughout the I-5 Corridor.
A drained RV battery can interrupt even the most carefully planned adventure. Whether you’re relaxing in Burlington, WA, or exploring the I-5 Corridor from the Canadian border to Puget Sound, understanding why your RV battery is draining can save time and stress. Let’s dive into the most common culprits and practical fixes.
1. Parasitic Power Draws
Even when your RV is off, devices like clocks and CO detectors can quietly pull power.
Examples: Security systems, appliance standby modes, or lighting controls.
Fix: Install a battery disconnect switch to eliminate unnecessary drains.
Recommended Product: A high-quality battery disconnect switch can keep your battery fresh while parked.
2. Old or Worn Batteries
Batteries naturally lose their efficiency over time.
Signs of Aging: Slow charging, visible corrosion, or difficulty holding a charge.
Maintenance Tip: Check water levels in lead-acid batteries and clean terminals regularly.
Upgrade Opportunity: Consider upgrading to a lithium-ion battery for superior lifespan and capacity.
3. Faulty Charging Systems
A failing alternator or converter can leave your battery undercharged.
Symptoms: Dim lights, inconsistent charging, or unresponsive appliances.
Solution: Have your system inspected by a professional to ensure all components are functioning properly.
4. Extreme Weather Impacts
Temperature extremes can reduce battery efficiency.
Cold Weather: Insulate the battery to prevent freezing.
Hot Weather: Park in shaded areas to avoid overheating.
Monitoring Tool: Bluetooth battery monitors can help you keep track of battery performance in extreme conditions.
Affiliate Disclosure
This article contains affiliate links. If you purchase through these links, we may earn a small commission at no cost to you. Thanks for supporting Odyssey Mobile RV Repair.
Call to Action
Don’t let battery troubles ruin your trip. From Burlington to Marysville, Odyssey Mobile RV Repair is here to help.
👉 Submit your service request now and get your RV’s power system running smoothly again.

Awning Repairs & Replacements
Restore Your RV’s Outdoor Living Space
An awning transforms your RV’s exterior into a cozy living space, offering shade and shelter for outdoor fun. But what happens when it tears, sags, or just doesn’t work anymore? Awning repairs and replacements are common issues, especially for well-loved RVs.
Common Awning Problems
Loss of power on the wiring harness
Awning wont extend or retract
Tears and holes from wind or debris
Motor failures common with all electric operated awnings
Sagging, improper retraction or misalignment
Moss growth (for our pacific northwest customers)

Repair or Replace? Small issues like tears can often be patched up, while significant damage or aging mechanisms might call for a full replacement. New awnings come with warranties and may be worth purchasing. It is also possible to get a custom awning fabric made at a boat cover shop, if your original equipment is still in good shape.
Expert Help Don’t let a damaged awning cramp your outdoor style. Whether it’s a repair or replacement, Odyssey Mobile RV Repair can help. Submit your service request now and get back to enjoying your RV adventures.
Click the button below to schedule your Awning Repair.

Keeping Your RV Powered: Tips for Troubleshooting Common Electrical Issues.
Learn how to troubleshoot common RV electrical problems like power source issues, damaged wiring, and converter failures. Odyssey Mobile RV Repair provides expert mobile RV services from Burlington to Seattle.
Nothing disrupts a road trip like unexpected electrical problems. Whether you’re parked at a peaceful turnoff off of Bellingham’s scenic Chuckanut drive or exploring the beauty of the Puget Sound region, maintaining your RV’s electrical system is essential. Troubleshooting common issues doesn’t have to be overwhelming—this guide will help you tackle frequent electrical problems and know when it’s time to call for professional help.
Affiliate Disclosure
This article contains affiliate links. If you buy a product we link on the article from amazon, we may earn a small commission at no extra cost to you. This helps support our mission to provide valuable content for RV enthusiasts worldwide.
1. Start with the Power Source
Every RV’s electrical system depends on a reliable power source, so this is the first place to look.
Check the Batteries: Ensure they’re charged and inspect for corrosion on terminals.
Pro Tip: If you’re running out of battery power quickly, consider upgrading to a lithium-ion battery bank for longer-lasting performance. You can find high-capacity lithium-ion batteries here to upgrade your RV’s power system.
2. Inspect Your Shore Power Connection
When plugged into shore power, your RV should seamlessly draw electricity—but issues can arise.
Check the Voltage: Use a multimeter to verify the shore power outlet is delivering 120 volts.
Look for Damage: Inspect your power cord for cuts or wear.
When to Upgrade: If your RV frequently trips breakers or struggles with power delivery, consider a surge protector. Protect your RV’s power system with a high-quality surge protector.
3. Troubleshoot the Breakers and Fuses
Circuit breakers and fuses are your RV’s first line of defense against overloads.
Reset Breakers: Flip any tripped breakers off and back on.
Replace Blown Fuses: Always use the correct type and amperage rating.
Keep Spares Handy: Having a variety pack of fuses is a must for RV owners.
4. Check the Converter or Inverter
Converters and inverters play a crucial role in your RV’s electrical system, and issues with these components can lead to widespread power problems.
Look for Symptoms: Dim lights, a non-charging battery, or a buzzing noise may indicate a problem.
Upgrade Opportunity: If your converter or inverter is outdated, replacing it with a modern 2-in-1 unit can improve efficiency. Upgrade your RV’s system with a high-capacity inverter-converter unit designed for peak performance. Contact us for your options at 360-202-9719.
5. Inspect Wiring and Connections
Loose or damaged wiring is a common cause of electrical issues in RVs, especially after long journeys.
Focus Areas: Check connections near the battery, breaker panel, and appliances.
What to Look For: Frayed wires, scorch marks, or corrosion.
Pro Tip: Wiring repairs can be complex—if you’re unsure, it’s best to call a professional.
When to Call a Professional
If these troubleshooting tips don’t resolve your RV’s electrical issues, or if you encounter signs of serious problems (like burning smells or frequent short circuits), it’s time to bring in the experts. Odyssey Mobile RV Repair provides reliable mobile service along Washington’s I-5 Corridor, from the Canadian border to Puget Sound. Our certified technicians can diagnose and fix even the most complex RV electrical problems.
Call to Action
Don’t let electrical problems ruin your adventure. Whether you’re in Everett, Tacoma, or Burlington, Odyssey Mobile RV Repair is ready to help.
👉 Submit your service request now and get back to enjoying the freedom of RV travel.

Diesel vs. Propane Heaters: Pros and Cons for RVs.
Compare diesel and propane heaters for RVs. Learn the pros and cons of each heating option to find the perfect solution for your RV lifestyle in the PNW.
When it comes to heating your RV, two popular options stand out: diesel heaters and propane heaters. Both systems have their strengths and weaknesses, and the choice often depends on your specific needs, budget, and camping style. Let’s break down the pros and cons of diesel and propane heaters for RVs to help you make an informed decision.
Diesel Heaters
Diesel heaters are powered by your RV’s diesel fuel supply, or an external diesel fuel tank. This makes them an efficient choice for motorhomes or diesel-powered vehicles. Here’s what you need to know:
Pros:
Cost:
Diesel heaters are cheap. Entry level models with great reviews start at $80 on amazon. These are quality units and many say that the justification to spend $1,000 or so for a name brand unit just isn’t there. A new propane furnace costs significantly more if you are going with a Suburban furnace.
Integration:
Many diesel heaters integrate can with your vehicle’s fuel system, eliminating the need for separate fuel tanks. However, Odyssey can install your heater. We will not tap into your gas lines. You should have a qualified mechanic share input into whether it is possible for you to tap into your diesel fuel system of your RV. Odyssey can install fuel tanks next to the diesel heater for your install.
No condensation:
Diesel heaters put out extremely dry, hot air. They are popular with roof top tent owners camping in the rain. The diesel heater will dry the tent out if left to heat the tent.
Stable Fuel:
Diesel fuel is less volatile than propane, making it safer to store and use. Of course, this is not a ‘pro’ that is tangible but it is something to keep in mind.
Backup Heating System:
Having a diesel heater installed in conjunction with your propane furnace is a great way to ensure you always have a way to stay warm. Redundant systems is never a bad idea. A diesel heater gives you more flexibility to camp in colder climates. BTU’s far exceed your RV’s factory installed furnace.
Cons:
Cost:
Diesel Is often slightly more expensive then propane, per gallon.
Installation Complexity:
Installing a diesel heater can be more complicated and may require professional assistance.
Noise:
Diesel heaters can be noisier during operation, which might disturb light sleepers. If you have a small RV, you may already be used to a loud furnace.
Propane Heaters
Propane heaters are a common choice for RVs due to their availability and cost-effectiveness. They’re particularly popular among campers who frequently boondock or travel in warmer climates.
Pros:
Widely Available Fuel:
Propane is readily available at most RV parks, gas stations, and outdoor supply stores.
Quiet Operation:
Ducted Propane Furnaces operate more quietly than diesel systems, providing a more peaceful environment.
No Installation:
Propane heaters come installed in most RV’s and require no installation.
Cons:
Fuel Efficiency:
Propane heaters use propane quick if you are cooking in combination of trying to keep your RV warm.
Cold Weather Performance:
Propane systems can struggle in very cold temperatures, as propane’s efficiency decreases when it’s freezing outside.
Fuel Storage:
Propane tanks take up extra space, and running out of propane can leave you without heat unexpectedly or unable to prepare a meal for yourself or loved ones.
Factors to Consider
Climate:
If you frequently camp in colder regions, a diesel heater may be a better choice due to its reliability in low temperatures. (RV owners in the PNW, this is for you)
Budget:
For those on a tighter budget, a DIY diesel heater build is perfect. you can spend $150 and have this heater system roughly installed and keeping you warm
Type of RV:
Any type of RV can benefit from a diesel heater. Especially tent trailers (pop-ups) and travel trailers with less insulation. Overall, this type of heater will benefit anyone who likes cold weather camping.
Frequency of Use:
Full-time RVers or those traveling in extreme conditions might prefer diesel heaters for their durability, while weekend campers may find propane heaters sufficient.
Affiliate Product Recommendations
Conclusion
Both diesel and propane heaters offer unique advantages and drawbacks. Diesel heaters excel in efficiency, cold-weather performance, cost and durability, making them ideal for full-timers and extreme climates.
Assess your needs, travel style, and budget to choose the system that’s right for you. And remember, if you need help installing or maintaining your RV heating system, Odyssey Mobile RV Repair is here to help.
Submit your service request now for professional assistance.
Affiliate Disclosure
Some links in this article may be affiliate links. This means if you click on a link and purchase an item, we may receive a small commission at no extra cost to you. This helps us keep providing useful content and quality services to our customers. Thank you for your support!

RV Owners in Everett & Lynnwood: Need Reliable Mobile RV Service? We Come to You.
Skip the hassle of towing your RV to a shop! Odyssey Mobile RV Repair brings certified, stress-free RV service to Lynnwood, North King County, and beyond. Whether it’s electrical, appliances, or maintenance, we handle it all at your location.
Welcome to Odyssey Mobile RV Repair—your trusted partner for mobile RV repairs in Everett, WA, Lynnwood, WA, and beyond. Whether you’re tackling a frustrating electrical issue, need help with diagnosing appliance repairs, or require routine maintenance, we bring professional RV service directly to your location. Skip the hassle of RV shop delays and let us save you time, stress, and money.
Why Choose Odyssey Mobile RV Repair?
Certified Expertise You Can Trust:
At Odyssey Mobile RV Repair, you get a certified technician with experience that matters.
National RV Training Academy Certification: Our lead technician, Noah, earned his certification through a full-time, in-person accredited school at the National RV Training Academy in Texas.
Military Electrical Training: As a former Aviation Electrician in the US Navy, Noah spent 3 years working on EA/18G aircraft in Oak Harbor, honing his electrical expertise to handle complex systems.
Your RV is in highly capable hands, ensuring repairs are done right the first time.
Customer-Focused Service:
We prioritize long-term solutions, not temporary fixes.
If you are not happy with any part of our repair, we will come back and make it right.
Convenient Mobile Repairs:
Skip the hassle of towing your RV to a repair shop, dealing with long wait times, or arranging transportation. We come to you—whether you’re parked at home, in a campground, or anywhere in North King County.
Transparent Pricing:
We offer competitive, upfront pricing without the overhead of a traditional shop. Our goal is to provide top-tier service without surprises, ensuring you feel confident in your repair investment.
Avoid the Hassles of Traditional Repair Shops
Choosing Odyssey Mobile RV Repair means:
No More Waiting: Say goodbye to scheduling delays and “RV jail” at the dealership. Wait times for a simple repair? Hard pass.
Quality Over Rushed Repairs: We take the time to get the job done right the first time, so you don’t have to worry about repeat issues or ordering several parts that weren’t needed to begin with.
Savings in Time and Stress: Keep your RV where you are and let us handle the repairs. Ideally, you will have an ongoing relationship with who is working on your RV. You get a personalized RV service at your location, that you couldn’t get anywhere else.
The Benefits of Choosing Odyssey Mobile RV Repair
Peace of Mind: Every repair is completed professionally and guaranteed. If something isn’t right, we’ll make it right.
Personalized Attention: Ask questions and get tailored advice during and after your repair.
Local Expertise: Based near the I-5 Corridor, we understand the unique needs of RV owners in Lynnwood and North King County.
Ready to Book Your Appointment?
Odyssey Mobile RV Repair is proud to serve RV owners in Lynnwood, North King County, and beyond. Let us make your RV repairs convenient and stress-free.
👉 Submit your service request now as our schedule often books out weeks in advance.
Affiliate Disclosure
Some links in this article may be affiliate links. This means if you click on a link and purchase an item, we may receive a small commission at no additional cost to you. This helps us continue providing quality services to RV owners like you. Thank you for your support!

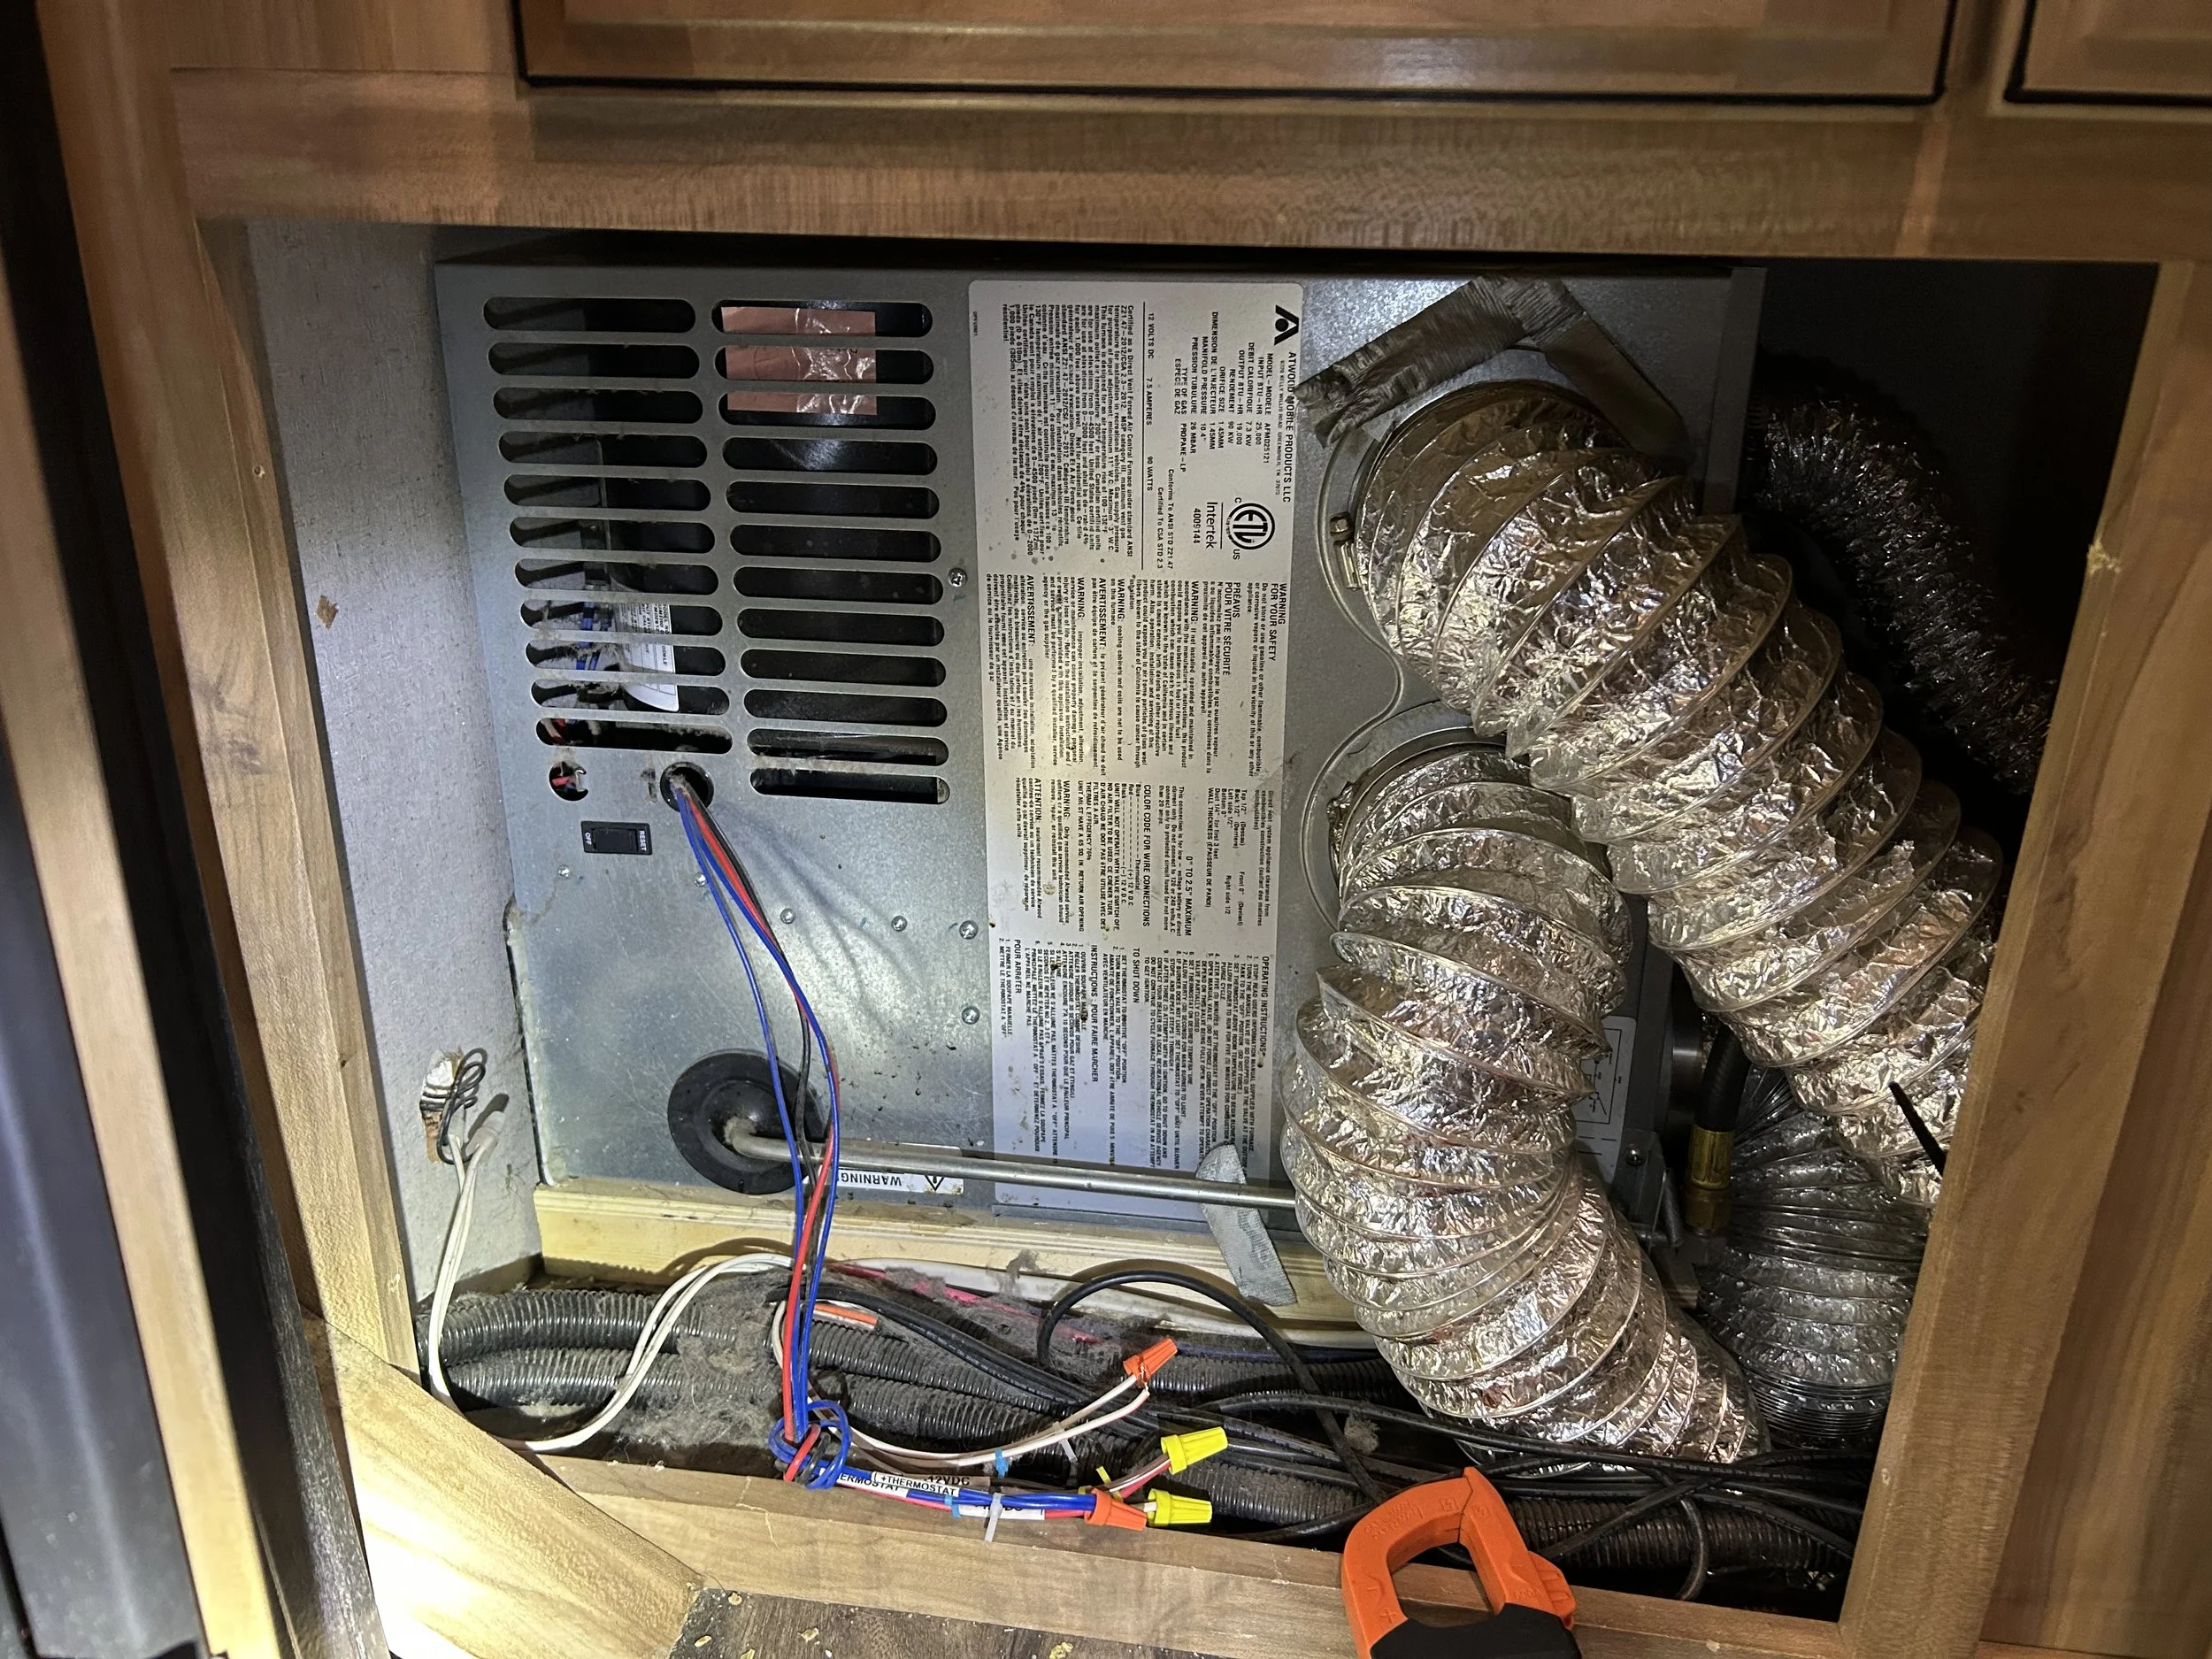
Common RV Furnace Problems and How to Fix Them.
Learn how to troubleshoot and fix common RV furnace problems with this step-by-step guide. Get expert tips and recommendations from Odyssey Mobile RV Repair.
Your RV furnace is essential for staying warm during those chilly nights on the road. But like any appliance, it can run into issues that leave you shivering. Understanding common RV furnace problems and how to fix them can save you time, money, and discomfort. Here’s a step-by-step guide to diagnosing and resolving the most frequent furnace issues.
Common RV Furnace Problems
Furnace Won’t Turn On:
Possible Causes: Faulty thermostat, dead battery, blown fuse, or lack of propane.
Solution: Check the thermostat settings and battery power. Ensure propane tanks are full, and inspect fuses or circuit breakers for damage.
Blower Turns On, but No Heat:
Possible Causes: Ignition failure, dirty burner assembly, or malfunctioning gas valve. Most common is a bad sail switch.
Solution: Inspect the igniter for dirt or wear. Clean the burner assembly and ensure the gas valve is operating correctly. Remove furnace access panel or furnace from its mounting point. Test Sail Switch.
Furnace Cycles On and Off Too Quickly:
Possible Causes: Overheating due to restricted airflow or a faulty thermostat. Thermostat could be mounted in the wrong area of the RV.
Solution: Check air intake and exhaust vents for blockages. Replace the thermostat if necessary.
Strange Noises:
Possible Causes: Loose components, worn blower motor, or debris in the fan.
Solution: Tighten screws, inspect the blower motor for damage, and clean out any debris.
Weak Airflow:
Possible Causes: Dirty air filters, clogged or poorly installed ducts, or a failing blower motor. Low battery could be a cause.
Solution: Clean or replace air filters. Check ducts for obstructions and inspect the blower motor.
Troubleshooting Steps
Check the Thermostat:
Ensure the thermostat is set to the correct mode and temperature. Replace batteries if it’s not functioning properly.
Inspect the Power Supply:
RV furnaces typically rely on 12V power. Test the battery voltage and ensure your RV’s power system is working correctly.
Verify Propane Flow:
Check that propane tanks are full and the valves are open. Inspect the propane regulator for leaks or malfunctions.
Inspect Coleman AC Wiring:
If you have a Coleman AC unit, note that the power wire for the furnace comes from the AC control box. Coleman AC units are wired directly through the control box to the furnace, which can complicate troubleshooting. Ensure all connections in the AC control box are secure and functioning properly.
Clean the Furnace:
Turn off the furnace and clean the burner assembly, fan, and vents. Use compressed air to remove dust and debris.
Test the Ignition System:
If the furnace won’t ignite, inspect the igniter for dirt or wear. Replace if it’s faulty.
When to Call a Professional
While many RV furnace issues can be resolved with basic troubleshooting, some require professional attention. If you’re dealing with gas leaks, extensive electrical problems, or a failing blower motor, it’s time to call the experts.
At Odyssey Mobile RV Repair, we specialize in diagnosing and repairing RV furnaces throughout Washington’s I-5 corridor. Whether you’re in Burlington or beyond, we’ll ensure your furnace is working efficiently and safely.
Submit your service request now to schedule your appointment today!
Tips for Preventing Furnace Problems
Perform Regular Maintenance:
Clean air filters and ducts regularly to ensure proper airflow.
Inspect Components Annually:
Check the burner, igniter, and blower motor for wear and tear.
Use Quality Propane:
Ensure your propane is clean and free of contaminants to avoid clogging the system.
Monitor Battery Voltage:
Keep your RV’s 12V system in good condition to power the furnace effectively.
Affiliate Disclosure
Some links in this article may be affiliate links. This means if you click on a link and purchase an item, we may receive a small commission at no extra cost to you. This helps us keep providing useful content and quality services to our customers. Thank you for your support!

Signs Your RV Electrical System Needs Professional Attention.
Is your RV electrical system acting up? Learn the signs it’s time to call a professional, from flickering lights to burning smells. Odyssey Mobile RV Repair provides expert services across Washington’s I-5 Corridor, from the Canadian border to Puget Sound.
Electrical problems in an RV can be tricky. One minute everything’s fine; the next, your power is out, your lights are flickering, or your appliances refuse to cooperate. If you’re exploring the picturesque country roads of Burlington, WA, or parked somewhere along Washington’s I-5 Corridor, from the Canadian border to Puget Sound, knowing when to call a professional can save you time, money, and frustration. Let’s explore the key signs that your RV’s electrical system needs expert care.
Affiliate Disclosure
This article contains affiliate links. If you click on a link and make a purchase, we may earn a small commission at no additional cost to you. This helps support our mission to provide valuable content for RV enthusiasts.
1. Frequent Circuit Breaker Trips
It’s normal for a breaker to trip occasionally, but frequent trips signal an underlying problem.
Possible Causes: Overloaded circuits, faulty appliances, or damaged wiring.
Why Call a Pro? Diagnosing the root cause requires electrical expertise and specialized tools. A professional can pinpoint and resolve the issue efficiently. That means ordering the correct part you need, the first time.
Quick Tip: Keep a variety of replacement fuses on hand. You can find RV-specific fuse kits like this one to ensure you’re always prepared.
2. Flickering or Dim Lights
Your RV lights are an ‘easy to see’ indicator of your electrical health.
Common Causes: Poor battery performance, loose wiring, or a failing converter.
When to Worry: If replacing the bulbs or recharging your battery doesn’t solve the issue, it’s time for a deeper inspection.
Pro Tip: If you frequently encounter dim lights, it could be a sign of an aging converter.
3. Appliances Not Functioning Properly
If your refrigerator, air conditioner, or microwave isn’t working as expected, the problem might not be the appliance itself.
Possible Electrical Culprit: Voltage fluctuations or damaged power lines.
DIY Check: Plug the appliance into a separate outlet or use shore power to confirm the issue.
When to Call for Help: If multiple appliances fail or you suspect a system-wide issue, let a technician diagnose the problem.
4. Burning Smells or Scorch Marks
A burning smell or visible scorch marks near outlets, breaker panels, or appliances is a serious red flag.
What It Means: Overheating wires or electrical shorts that could lead to fire hazards.
Why This Requires Immediate Attention: These are safety-critical issues that only a qualified technician should address.
5. Battery Draining Too Quickly
If your RV battery dies faster than usual, there’s likely a parasitic drain or charging issue.
Potential Problems: Faulty alternators, parasitic loads, or old wiring.
Pro Help Needed: A professional can test the charging system, check for hidden drains, and recommend upgrades if necessary.
6. No Power When Plugged Into Shore Power
If your RV isn’t receiving power even when connected to shore power, the problem could lie in your power cord, plug, or inlet.
DIY Check: Test the shore power outlet with a multimeter to confirm voltage. Inspect your RV’s power cord for damage.
Call a Pro If: The issue persists or involves internal wiring or components like the transfer switch.
Why It’s Time to Call a Professional
RV electrical systems are complex, and while some minor issues can be fixed on your own, diagnosing more significant problems often requires expertise. At Odyssey Mobile RV Repair, we specialize in identifying and resolving electrical problems for RV owners across Burlington, Mt. Vernon, and beyond. Whether your RV is a modern marvel or a vintage classic, we’ve got the tools and knowledge to keep you powered up.
Call to Action
Don’t let electrical problems derail your next adventure. Whether you’re in Burlington, Anacortes, or Everett, Odyssey Mobile RV Repair is ready to bring expert solutions to your location.
👉 Submit your service request now and let us take care of your RV’s electrical system so you can focus on the road ahead.