
Common Air Conditioner Problems in RVs and Solutions.
RV AC Repair Burlington WA | Mobile RV Air Conditioning Service
When the heat hits Washington and your RV’s air conditioner decides to quit, it’s not just uncomfortable—it can ruin the whole trip. Whether you’re boondocking near Bellingham or parked under the summer sun in Mount Vernon, a faulty AC is a major buzzkill.
At Odyssey Mobile RV Repair, we service RV air conditioners all along the I-5 corridor. Here are the most common issues we see with rooftop AC units—and what you can do to keep your cool on the road.
1. Blowing Air, But Not Cold
The Problem: Your AC fan is working, but the air coming out isn’t cool.
The Fix: This usually points to low refrigerant, a bad capacitor, or a failing compressor. Unlike residential units, most RV ACs are sealed systems, so if refrigerant is the issue, it likely means a full replacement is needed. Capacitors, however, are serviceable on-site.
2. Unit Won’t Turn On
The Problem: No sound, no fan, no response at all.
The Fix: First, check your circuit breakers and fuses—especially if you’re running other high-load appliances. Next, test your thermostat. If it’s digital, make sure it has power or replace the batteries. If all checks out, the issue may be a faulty control board or a bad capacitor.
3. Air Conditioner Freezes Up
The Problem: Ice forming on the coils or cool air suddenly stops.
The Fix: Dirty filters, low airflow, or high humidity are the top suspects. Turn off the unit, let it thaw, and clean or replace your air filter. Run the fan only for 30 minutes before restarting the cooling cycle. If it keeps freezing, the evaporator coil or blower motor could be to blame.
4. Strange Noises or Vibrations
The Problem: Loud humming, buzzing, or rattling up top.
The Fix: Loose fan blades, worn bearings, or even debris in the unit can cause this. It’s worth opening the shroud and inspecting for anything obvious. If the noise persists, have a mobile RV technician inspect the motor and mounting brackets to prevent damage from vibration.
5. Bad Smells When Running
The Problem: Musty or burning smells when the AC is running.
The Fix: A musty odor often points to mold inside the evaporator or ducting—common if the AC hasn’t been used in months. A burning smell could indicate electrical failure. Turn the unit off immediately and call a professional.
We’ll Keep You Cool
There’s no reason to sweat it out while waiting on a service center. From Burlington to Bellingham, Odyssey Mobile RV Repair comes to you. We diagnose, repair, and replace RV air conditioning units without the hassle of towing your rig.

How to Diagnose and Fix RV Air Conditioner Problems.
Discover common RV air conditioner problems and how to troubleshoot them. Stay cool on the road with expert tips from Odyssey Mobile RV Repair located in Burlington, WA. Serving Washington states I-5 Corridor from Bellingham to Seattle.
An RV air conditioner is essential for staying comfortable in your RV. When it stops working, the sweltering heat can quickly dampen the fun and ruin everyone’s time. Fortunately, with a bit of troubleshooting, you can identify common problems and even resolve some of them on your own. Here’s a guide to diagnosing and fixing RV air conditioner problems no matter the brand. (most common are dometic & coleman units on rv’s).
Common RV Air Conditioner Issues
We will get to solutions to these problems below, but it’s important to recognize the most common problems that RV air conditioners encounter:
Unit Won’t Turn On:
Causes include power supply issues at the hookup or pedestal, tripped breakers, or faulty wiring. If you are trying to run an AC off of a normal household outlet, this will only work if you can ensure your AC is not pulling more then 20 amps. RV units pull on average around 23 up to 30 amps on a hot day. Soft starts can be installed on most A/C units to allow for use on a 20 amp household outlet. (we can and would be happy to install a soft start kit for you).
Weak Airflow:
Often due to dirty filters, obstructions, or blower motor problems. Some HEPA filters can cause too much obstruction and weaken airflow and efficiency.
Air Isn’t Cooling:
This could indicate a refrigerant leak, compressor issue, or dirty evaporator coils. Very rare that this actually happens. If it does, it is time for a new unit.
Unusual Noises:
Causes range from loose parts to a failing fan motor or damaged compressor. These fan blades in the unit are plastic, they will break, chip or lose fins sometimes.
Water Leaks Inside the RV:
Usually caused by clogged drain lines or improper installation. Condensation off of the air conditioner coils can roll right inside the rv through a failed AC gasket.
Affiliate Disclosure
Some links in this article may be affiliate links. This means if you click on a link and purchase an item, we may receive a small commission at no extra cost to you. This helps us keep providing useful content and quality services to our customers. Thank you for your support!
Troubleshooting Your RV Air Conditioner
Follow these steps to identify and potentially fix the problem:
Check the Power Supply:
Ensure your RV is properly connected to shore power (sufficient amperage) or your generator is functioning. Inspect the circuit breaker panel for tripped breakers and reset if necessary. Do not keep resetting a tripped breaker, there is likely a reason for the trip.. (don’t be that guy).
Remember that RV air conditioners use both 12V and 120V systems. The 12V system powers the thermostat and control board, while the 120V system powers the compressor and fan. Confirm both systems are receiving the correct input voltage. In simplified terms.. Make sure your battery is in good shape. If it is a serviceable lead acid battery, verify that your cells are full with distilled water only. This is so important and a very neglected part of an RV’s electrical system.
Inspect the Filters:
Dirty filters block airflow, reducing efficiency. Remove and clean the filters or replace them if they’re worn out. Some HEPA filters are too thick to allow for the AC to work at its most efficient rate.
Examine the Thermostat:
Make sure your thermostat is set to the correct mode and temperature. Check for loose wiring connections at the back of the thermostat. Loose wires can cause communication issues where your thermostat is on, but it is not sending power to your AC. We have seen this many times.
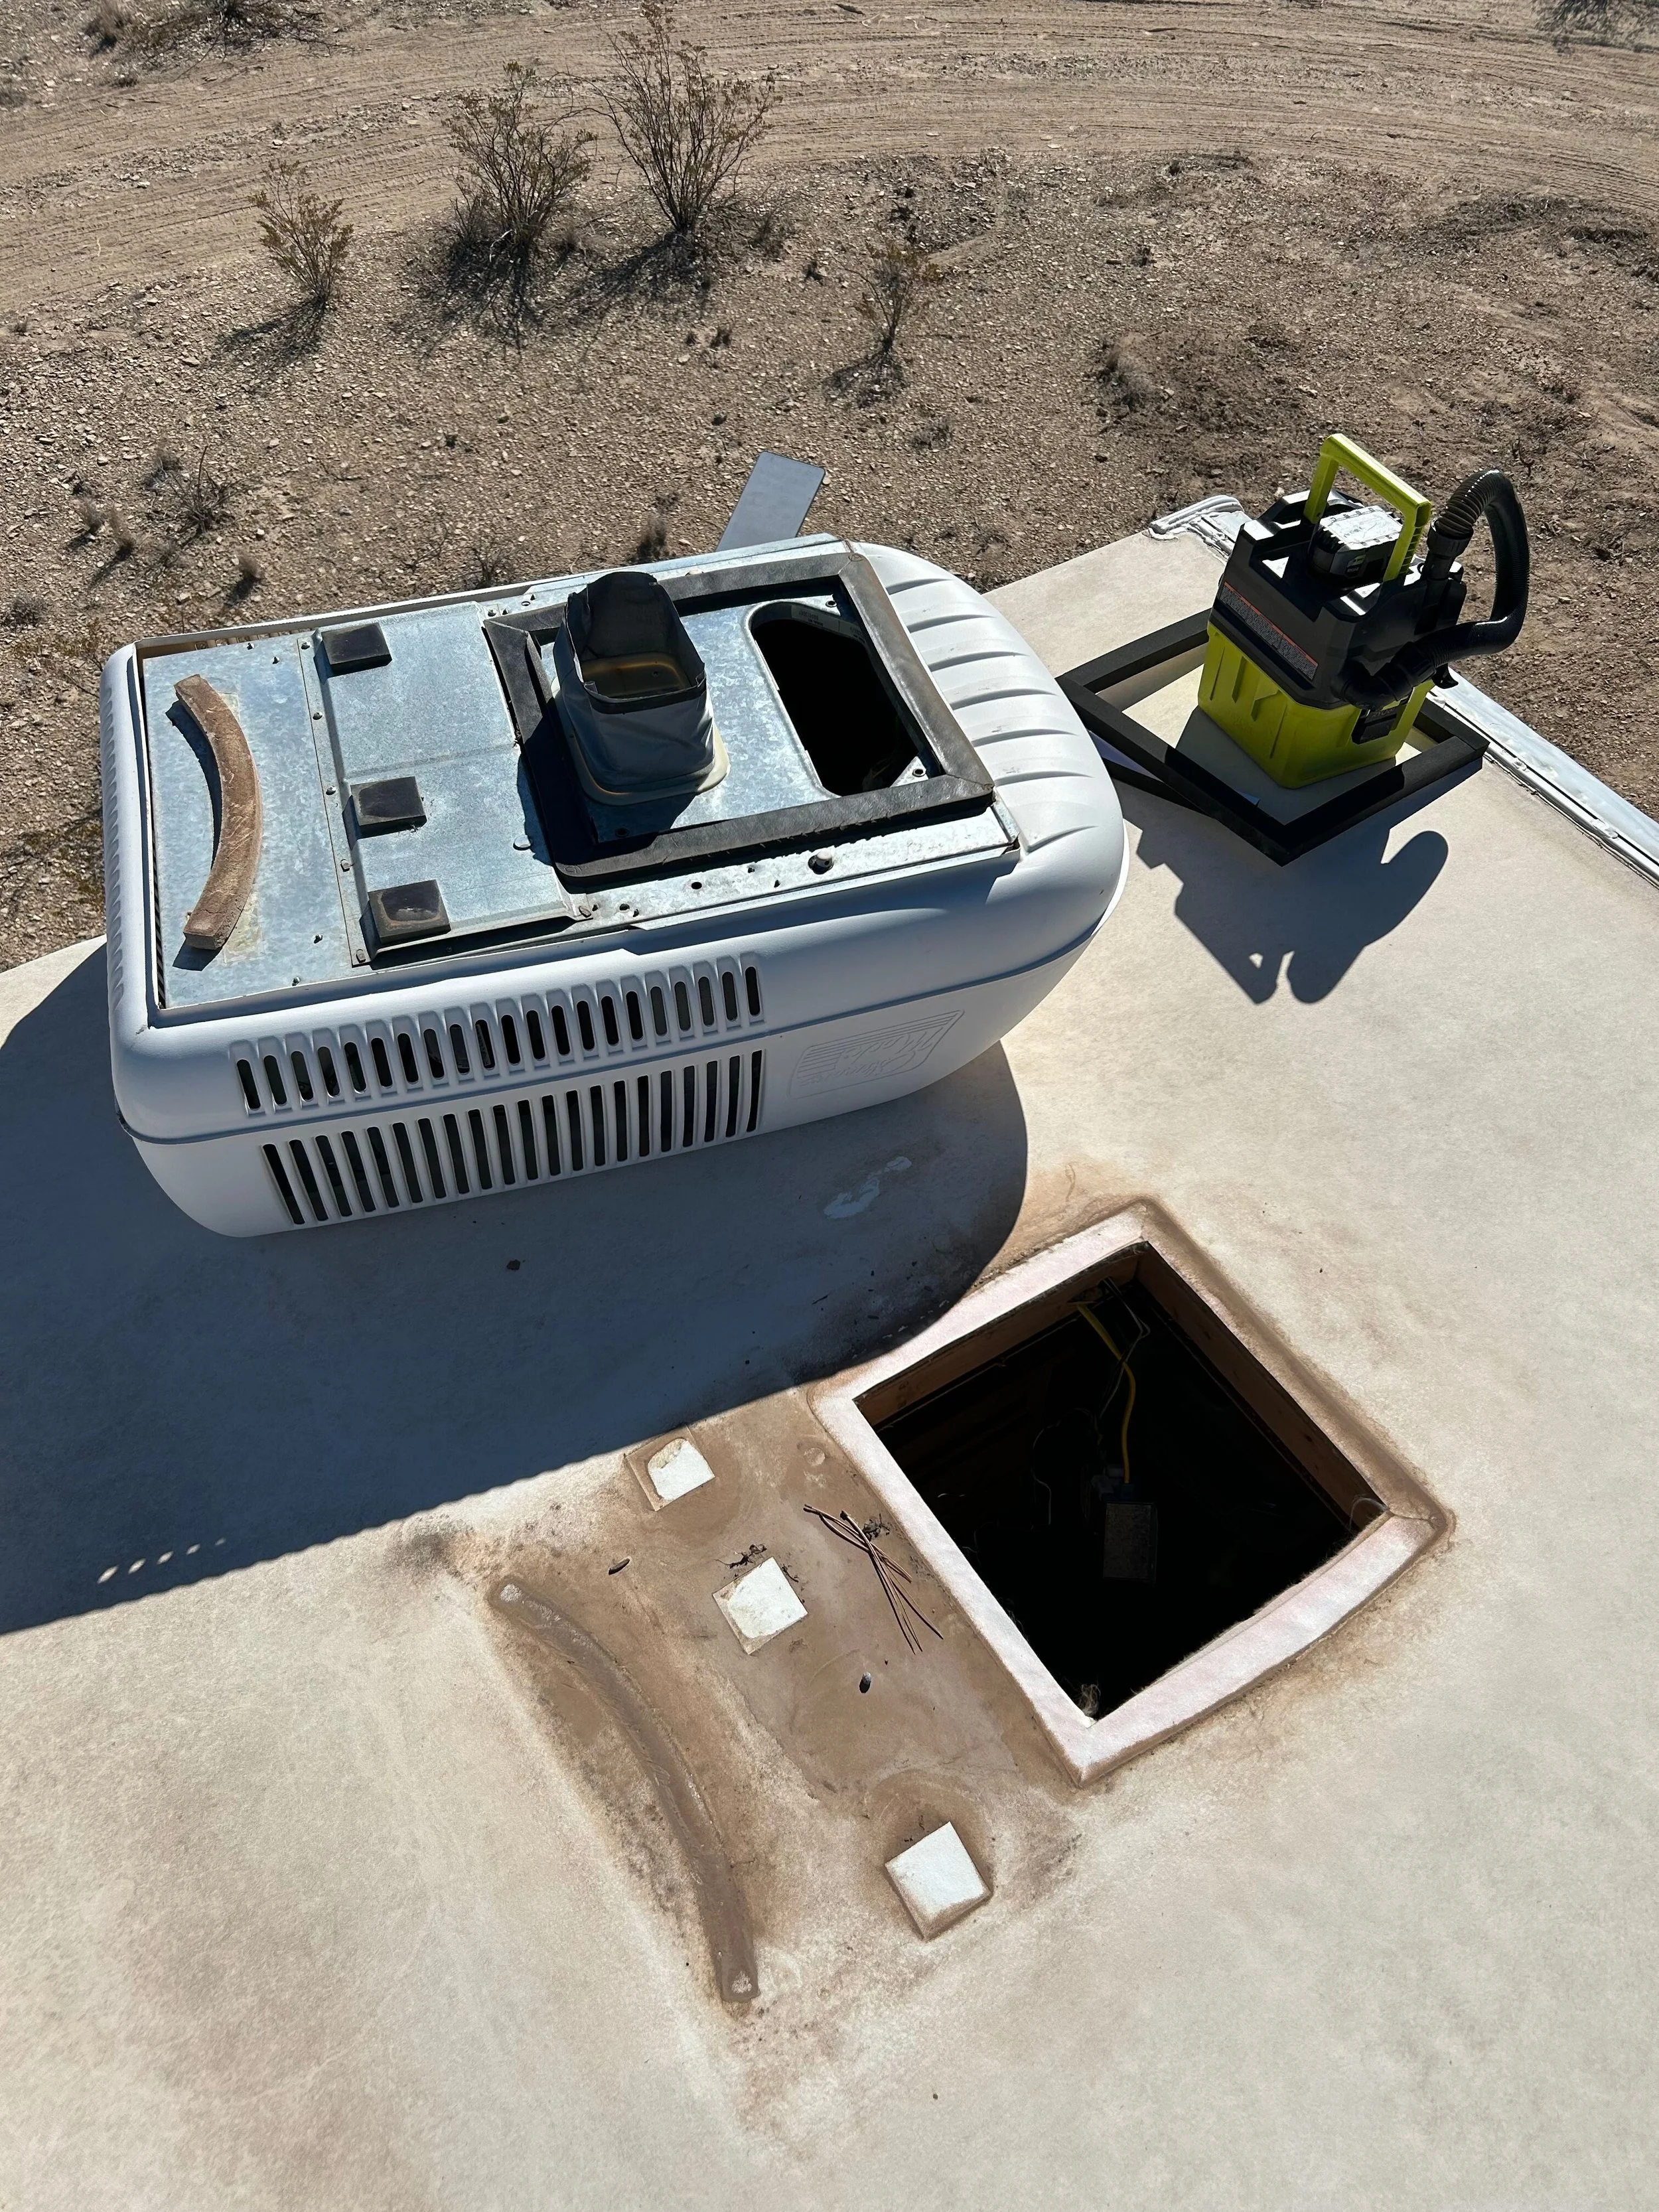
Inspect the Exterior Unit:
Clear any debris from the AC unit on your RV’s roof. Ensure the condenser coils are clean and free of obstructions. A good practice is to use an electric leave blower, with caution and care, to blow dust and dirt off of the A/C unit internals. We like this Milwaukee blower and use it on jobs where we clean the A/C Coils. While you’re on Amazon, pickup some coil cleaner while you are there!
Listen for Unusual Sounds:
Rattling or buzzing noises can indicate loose components or a failing fan motor or blower wheel.
Look for Water Leaks:
If water is leaking inside, inspect the drain pan on the roof and drain lines for blockages. Clean the drainage paths thoroughly to restore proper drainage out of the A/C pan and off of the RV’s gutter spouts usually found on the corners. Some Class-A coaches have a drainage system that travels down through the RV interior and down a condensation line. These can and will get clogged.
Test the Compressor:
If your unit blows air but doesn’t cool, the compressor may be failing or the refrigerant level may be low. This requires professional attention to diagnose. In the case of a bad compressor, be prepared for a new unit.
Most Troubleshooting Happens Inside:
The diagnostic steps can be performed inside your RV. Starting with the thermostat and inspecting the connections. Next would be checking inside the A/C garnish by removing the cover and filters. The control box is found inside this area and all the troubleshooting can be done by pulling out the control box. To test the compressor if needed, that is when we would need to pull out the ladder and get inside the unit from the roof.
When to Call a Professional
Some issues, like a faulty compressor or refrigerant leaks, require specialized tools and expertise to give an accurate diagnosis. If your troubleshooting doesn’t resolve the problem, it’s time to call in the experts.
At Odyssey Mobile RV Repair, we’ve helped countless RV owners along Washington’s I-5 corridor to diagnose and repair their air conditioners. Whether you’re in Skagit County or further south, we’re here to ensure your comfort on the road.
Submit your service request now for professional air conditioner repairs.
Tips for Preventing Future Problems
Perform Regular Maintenance:
Clean or replace air filters monthly during heavy use.
Inspect the condenser and evaporator coils regularly.
Keep the Unit Clean:
Ensure no debris accumulates on or around the exterior unit.
Schedule Annual Inspections:
A professional cleaning and tune-up can catch issues before they become major problems.
Monitor Power Usage:
Avoid overloading your electrical system to prevent damage to the air conditioner. Consider using a surge protector.